Building a DIY Concrete Hot Tub is easier than you think. In this article we will follow the progress of Kyle and his DIY Concrete Hot Tub build.
Background
Kyle contacted Andi from buildahottub.com in July of 2021. Kyle has been getting quotes from local builders and pool builders for the concrete hot tub that he was looking to create. These quotes has been coming in at around $100K. Yes, you read that correctly, $100K. Huge amounts of money for what Kyle was looking to do. So, Kyle began to look for alternatives and he found Andi at Buildahottub.com
Initial Contact
Kyle got in touch via the web chat and he and Andi also had a conversation and exchanged several emails regarding what Kyle was looking for and what he wanted to build. It was important for Andi to understand exactly what he wanted from his concrete Hot Tub.
Scope of Work
The scope of work was drawn up and agreed upon by both sides.
In short, design the Spa and plumbing to Kyle’s spec. Kyle was then going to do the plumbing portion himself and have a contractor come in to do the concrete work.
DIY Concrete Hot Tub – The Design Phase
The design phase did go without a hitch. That said, Kyle’s plans did have to be modified as the distances of pipe runs were just too great. He initially wanted to have the control room some 80′ away from the Hot Tub. After Andi had done the flow calculations it was just not going to work. So, Kyle decided that he would build a pump room a little closer to the tub so the runs in the end of pipe were only about 20′ from the Tub. Much better for flow rates.
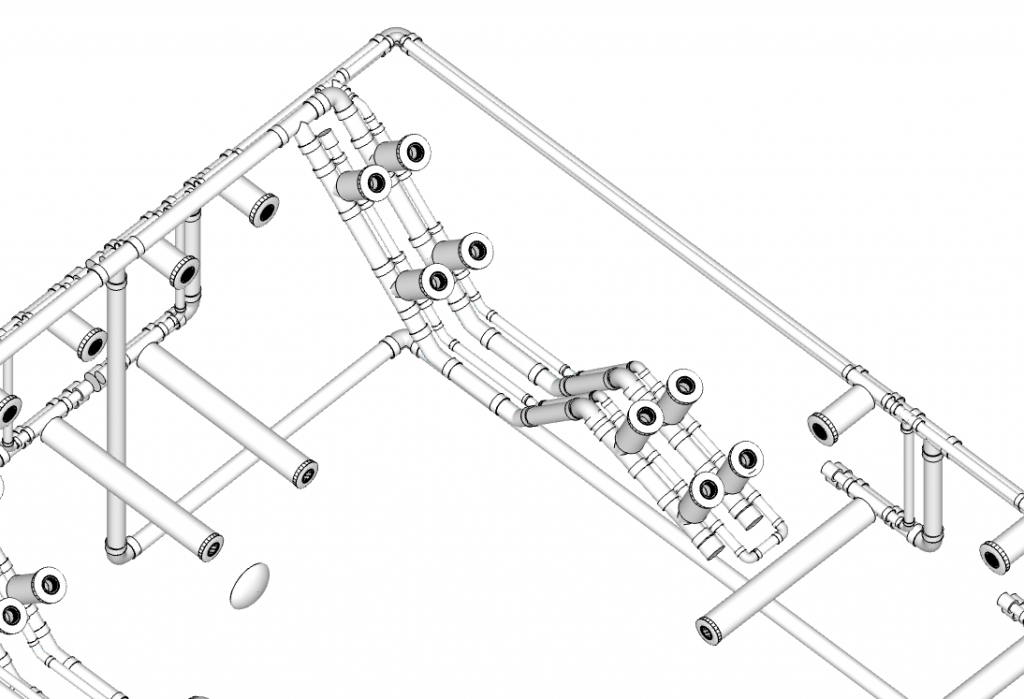
Kyle did however have some pretty cool ideas for what he wanted to do with concrete loungers and you can see below the plumbing diagram that was produced! This is just the lounger for the Concrete Hot Tub! On the videos below, Kyle explains how he actually reigned in ideas, even after the plans were drawn up!
Plans can also be found in the online shop.
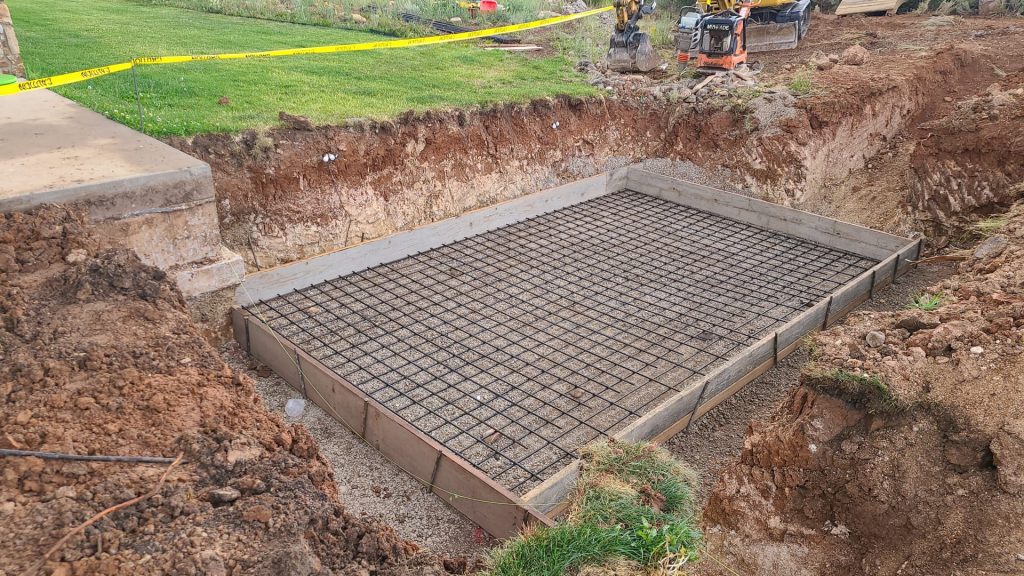
Late July 2021 – The Concrete Hot Tub Build Starts
The first thing that Kyle had to do was to build the pump house that was going to house all the pumps. This has its own concrete base and took him a couple of weeks to build.
Following the excavation of the area, the next steps for Kyle were to lay the inward and outward pipes
Then, it was time to make the form for the concrete base.
Intro from Kyle on his DIY Concrete Hot Tub Build
This is the introduction of Sanders family in Colorado about a DIY concrete hot tub journey project helped by Andi with Buildahottub.com to design the project. The words are Kyle’s and come from the video below.
Basic rundown of the project:
- This is going to be a 15 by 8 by 5 foot deep hot tub
- It’s sort of a combination of a hot tub and a plunge pool.
- All the flow dynamic calculations for the plumbing done by Andi. Andi also gave great schematics and 3D renders of the whole project.
We ended up using a contractor to help us with it because I was a little daunted by trying to do it myself. Now that I’ve seen what the contractor has been doing it’s definitely possible to do it myself. I just didn’t have experience doing rebar and pouring concrete. So this is a poured hot tub, not a cinder block. So, there is a little difference but we decided to do it for the integrity and the cold weather here.
Now, I’m going to walk you through that here.
So first –
- I had to build a pump house, we needed one fairly close to the hot tub.
- This is an 8 by 5 foot pump house that I built,
- It took me about two weeks,
- We poured a concrete slab to do that and I mixed the concrete with just a portable mixer and it was not too bad.
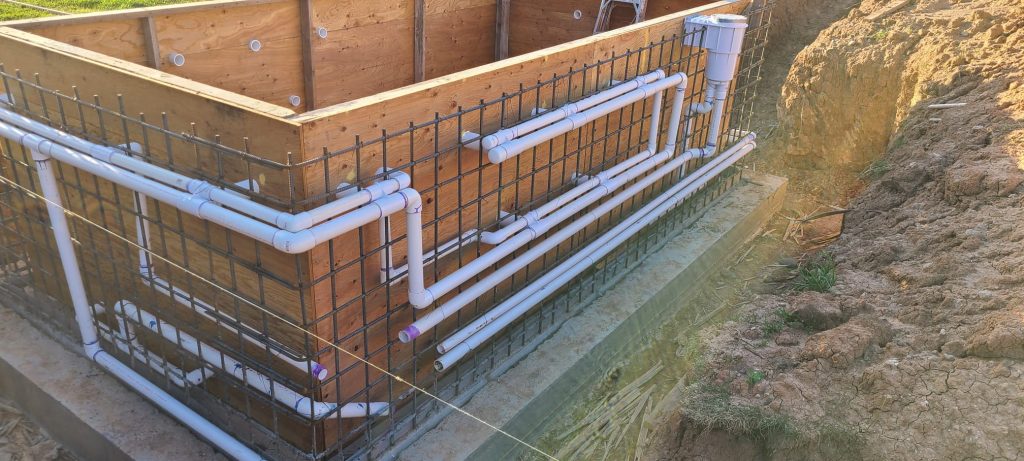
We had to run wiring which I wanted to insulate because we’re in a cold weather climate. And just as you can see here –
- I’ve started the plumbing.
- This plumbing goes straight down through the floor about 4ft underground, which is our freeze line here in Colorado.
- These go down and take a 90 degree angle over to the hot tub.
In the back –
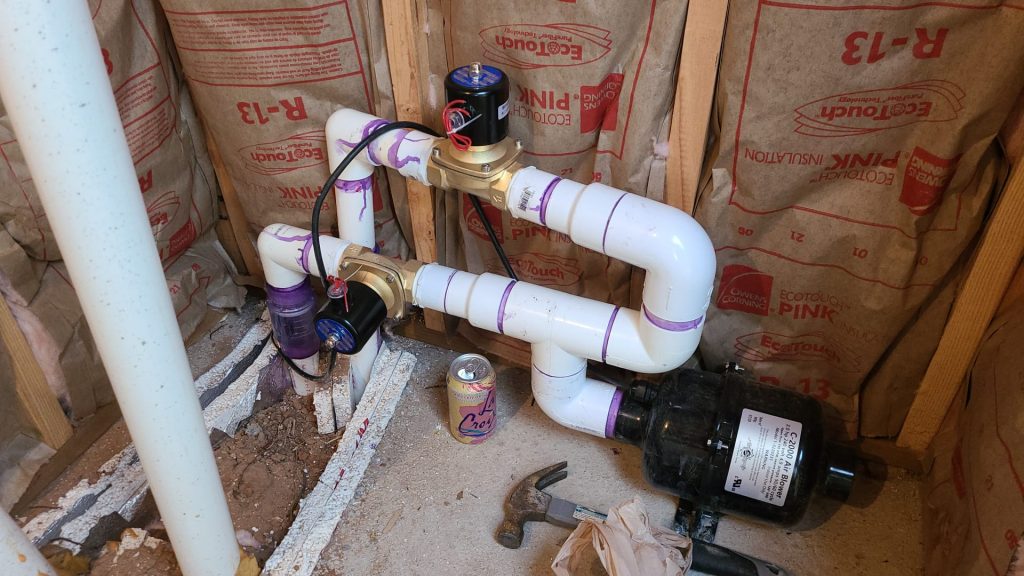
- I’ve installed the air blower which has two circuits those are solenoids on there to determine where the air goes,
- then these next set of pipes will be for 16 jets, a feed line and a return line both 2 inches
- and then another set of 2 inch feed lines and a return line for the combination pump and spa controller, which will feed another 16 jets.
- We had originally planned it for 48 jets, but I’ve dropped it down to 32.
I am doing all the plumbing myself so the 32 jets to me ought to be plenty.
The heater will sit where this blank spot is. That’s the electrical coming in from the panel.
Remember – you have to have at least 50 amps of 240 available in your home circuit panel to add this kind of a system.
We’ve also done some audio visual speakers and things like that that are part of all of that. We have propane out here so that metal grey tubing is propane that will feed the heater which is a pool heater because of the size of this unit. So that’s sort of the rundown there.
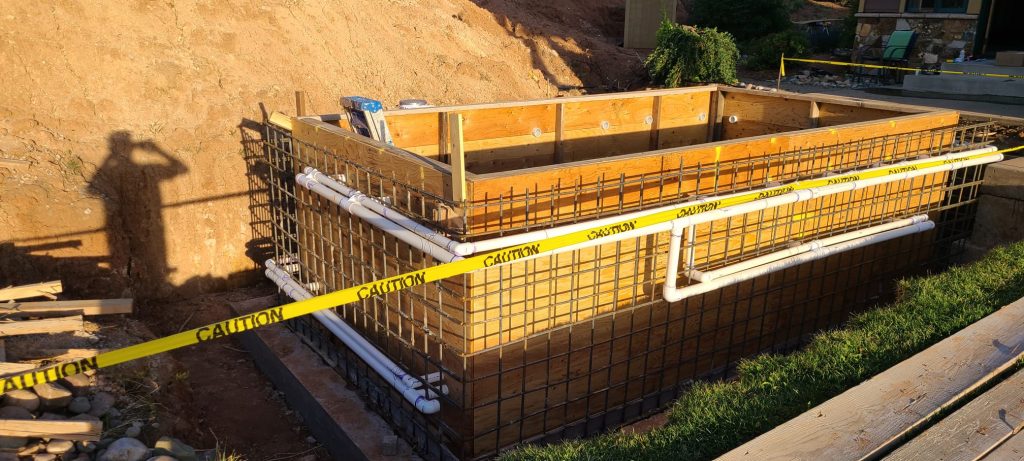
You can see leaving the pump house, this was all 4ft deep trench.
What I’ve done is the pipes are dead ended here in the trench until the spa builders or the concrete guy is ready. So, those white pipes are what came out from the pump house. That black plastic tubing is actually to run hydraulic lines through if we decide to do a swimming system in the future.
So, those are just blanks that’ll be over there for future expansion if we want it. This ditch goes all the way to the hot tub there and we’ll finish plumbing it out.
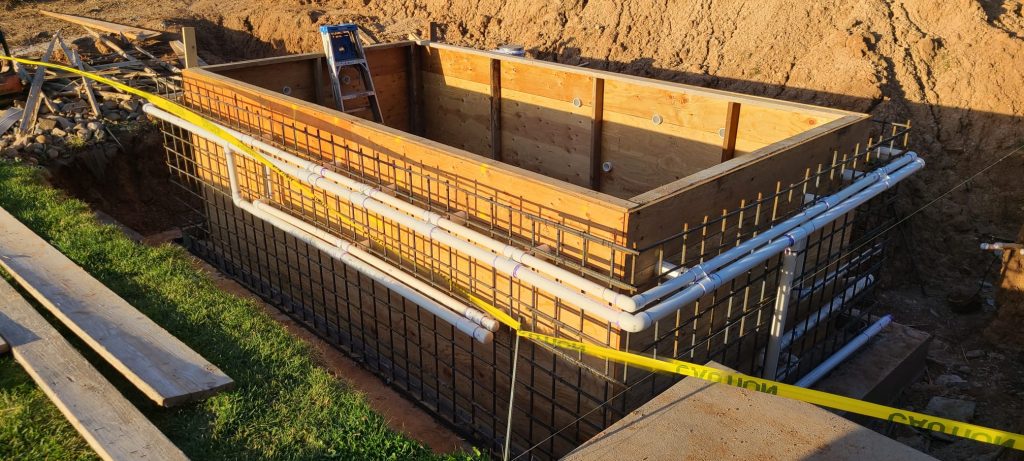
The Structure of a DIY Concrete Hot Tub Build
Sanders family building a poured in place DIY Concrete Hot Tub – 15 foot by 8 feet wide by 5 feet deep hot tub which is going to be a very large hot tub, more like a plunge pool. All the design for this project has been done by Andi at Buildahottub.com.
On the project, I did end up using a concrete contractor to help build this out as I haven’t done a lot of concrete work and I was a little daunted by it. But now that I know or I’ve seen him do it, I’m going to explain to you as I think it’s very doable on your own particularly with Andi’s plans.
The plans are super detailed and I will walk you through every step of the process. There’s the pump house with the lines headed over here:
- So first they dug the hole and had to level up everything.
- Water’s heavy, so this is going to be a really solid structure. You can see they used a little upgraded larger rebar. I can’t remember which number it is. But everything is in six-inch centers.
One of the things that I’ve learned with this is:
- Waterproofing concrete is really important when you’re building a hot tub or a pool that concrete is porous and not inherently waterproof by nature. So you want to pay attention to that.
- Initially, they were going to pour this in a monolithic manner which means they pour the floor and the walls and everything at the same time so there are no gaps.
- The reasoning to do that was to make sure that it was waterproof but that’s turned out to be a little harder than we thought, so we’re pouring it in two units. The slab is going to be a 12-inch slab and this is the footing on the outside so the interior and exterior wall will be poured at one time the whole floor.
- The walls will be poured separately after they put up the forms on the inside and the outside and I do all the plumbing.
- So to join the slab and the wall, what we’re doing you can see these 2 by 4 and the concrete will come up to the outside here which is at the level of those 2 by 4 and will fill in here and then these two by fours will create a notch in the footing.
- This rubber here is waterproof and you can see it sticks down into the footing to form a watertight joint.
- So the water bar which is this rubber material half of it will be down in the foundation and then half will be sticking out of the foundation and eventually will bond into the wall. When those go up and that will span that gap between the floor and the wall to make that watertight.
- The other thing is these 4 by 4 will come out and they’ll be a notch in the foundation so when we pour the wall. They call it a keyhole or a keyway. So the vertical wall will have cement that goes down into the foundation and keys into that to lock it in place. That adds strength and it also again you can imagine water would have to go from inside down the keyway through the water bar plastic across and back up to get out. So that’s one of the waterproofing techniques for this process.
So all they did was:
- They formed up the foundation first.
- Put in the rebar.
- Then they came in and you can see how they have bent and tied the rebar to the foundation rebar just with wire to get the vertical components started up and then they just built this cage. That is all they’ve done of rebar.
And then
- The pipes will come in will go in here.
- All of the jet bodies will be mounted on the outside they’ll go through here.
- The interior forms will be out of plywood so I’ll cut holes through the plywood.
- The two-and-a-half-inch PVC will go through the plywood.
- Then we’ll seal around it with silicone before we pour the concrete and cap those.
- Next, you’ll see all the plumbing will end up eventually out here.
- Then we will have to mount a skimmer up in here.
- I’ll have to cut out a section for the skimmer to determine our levels
This pool is going to sit the edge will be about 20 inches above ground level. So the idea is you’ll walk out on this concrete, you can sit down on the edge of it, it’ll be chair height swing your feet over and then down into the hot tub. And the hot tub will have a bench around the interior except for one end where you can stand. But it’ll be 270 degrees of a bench to sit on with some loungers and then lights and jets.
We’re going to cover the whole thing in tile, interior and exterior originally. We had talked about just doing raw concrete for the look but I’m worried about sealing it. So what will happen is after this concrete cures for 30 days, we apply a pool approved waterproof sealer, you seal the whole thing the whole interior and they guarantee the waterproofing and then you seal around all the jets that come through. So you seal that, you give it a few days and then you use pool approved mortar for your tile and grout for your tile and then we’ll tile the whole interior and then we’ll have capstones like bluestone around the top edge and then just flagstone or travertine around the exterior 20 inches that shows.
Thanks so much and Andi all of these plans are yours and the designer, everybody has been impressed with all the structural engineering and the flow dynamics. They’ve run this past a structural engineer and thought that the design was spot on.
The Parts for a DIY Concrete Hot Tub Build
So I am using a contractor to pour the pool. I am doing all the plumbing myself based on the Buildahottub.com designs that Andi did for me and I think by doing I’ll be able to get it done for about $50,000 instead of $100,000.
If I hadn’t been scared to do the concrete pour which now I’d be comfortable knowing the design and rebar structure I think you could probably drop it by another $20,000 or so if you did that yourself too.
So probably possible to take $100,000 total contractor bill down to about $30,000 if you did it yourself using Buildahottub.com designs, so pretty neat for a pretty high-end poured in place hot tub.
**Please remember this is a very large poured in place DIY concrete hot tub. Most customers build a block built tub for around $6500 all in**
One thing that I didn’t realize until I got into this and it’s what made me share this is to tell you about all of the supplies that you’ll need and they’re expensive.
A big portion of your cost for something like this is going to be the equipment for the spa:
- So pipe wise I think I’ve spent a couple of $1,000 just on two and a half inches, two inches, an inch and inch and a half-pipe which is outside laid in big piles.
- The other equipment you know you’ve got pumps
- Wire.
- Sealer.
- Heaters.
- Spa control pack.
This is a big unit big project. I’ll just walk you through a few of these things.
- That huge box in the back is a 266 BTU raypak heater designed for propane. Those run about $2000 or $3000.
- That’s the vent hood for it to get it vented outside of the building.
- Some receivers for posts to do some sun shades over the hot tub in the future if we want.
- Those green leaded buckets, you can see is the hydro ban that I’ve chosen to use to waterproof the interior of the structure. And this is all certified for pools and supposed to be really good stuff.
- These are going to be the drains. I’m going to have four drains and these are going to go low in the sidewalls instead of in the floor for just easier plumbing purposes. They need to be 30 inches apart for safety reasons.
- This is some of the sealer tapes that you put in the corners for the hydro ban before you roll it on again to seal across joints.
- There’s the two-and-a-half-inch pipe there’s less of it that’s needed.
- Then here are some speakers that are going to go outside.
- This is some light equipment for the pool light to go in there.
- There’s the water filter.
- Lots of elbows and 90s and items like that.
- This is to add an endless pool feature pump in the future such as just a blank receptacle that will let us add that easily instead of having to do more construction in the future.
- Silicone sealer.
- Gunite bodies are over there.
- Here’s a bunch of the spa jets that will go you know and there’s 32 of these.
- This is just in caps to cover the two and a half inch
Gunite bodies before they go and they’re all there’s a whole 32 or extra Gunite bodies. Again, you know, here they are, this is all on the website. But these will be mounted to the rebar,
- Lots of valves for the pump house.
- There’s one of the pumps that’ll be in there.
- These are large 220-volt pumps.
- Here’s the skimmer that will go on the side and some propane attachments down there in yellow.
- In some unions, you want to be able to take the equipment out and replace it or do repairs to it at some point.
- This is a salt generator. So we’re going to do a salt hot tub with this. I know people do just the ultraviolet light for these with a little bit of my chemistry background. One of the things that worries me about that is that just cleans the water when it goes through the system in the pump house. So there’s actually with UV light, there’s nothing out in the water, that’s killing bacteria actively in the pool itself. And so there’s the possibility to transfer bacteria from person to person in the hot tub when you’re in there together.
Because the waters are only cleaned when it’s pulled out and run through the UV. So a salt generator generates chlorine. And chlorine is in the water and actively kills any sort of virus or bacteria. and prevents transmission from person to person. This is going to be this is an automated salt system. So you pour in a bag of salt once a year or so and then it just converts it chlorine back to salt chlorine back to salt and keeps the levels proper.
You do have to worry about concrete and chlorine and salt. They don’t tend to get along well. So again, you want to seal the concrete to protect it. You can just see the amount of stuff that’s piled up here in preparation and there’s a big cost to all of this equipment almost as much or more than the actual concrete build itself is tied up in plumbing and heaters and pumps and so forth sealers.
I hope that’s helpful when you’re planning and when Buildahottub.com does the designs for you, Andi will price all of these things out and list them out. Like a number of elbows, PVC elbows that you need a length of pipe all of those things so that you have a great shopping list.
When you go to get these things so that you make sure you have everything you need. And right now with COVID, that’s important because it takes us so long to get parts. Andi carries all of the parts and you can order it all direct from him too.
Here is an update from Kyle on the project. These are his words taken from the video below.
It’s August 2021 in Colorado and this is an update on the hot tub project that Andi over at www.buildahottub.com has helped design. The design is a poured in place DIY concrete Hot Tub.
We are at the plumbing stage and this took two people and four days to get it finished. These are the pipes back here you can see the pump house, the pipes run underground 5ft down and then come out down here and connect into the hot tub. This is setup to have 32 jets with two jet pumps and one air pump.
A walk around the project:
On this side there’s a gunite body right there going through this that is going to be a poured concrete hot tub a little different than the cinder block designs.
I think a few things that I didn’t understand building this is the gunite bodies, put the inch and a half and two-inch pipe close together so things like going around that corner there the elbows have to be offset and it’s a little tricky.
I made some mistakes and had to throw a few gunite bodies away trying to deal with that so really pay attention to that if you’re plumbing your own. If somebody’s an engineer building a gunite body where the air is directly over the water making it more flush and a little bit more separation will certainly outsell all the other Gunite bodies on the market but I digress.
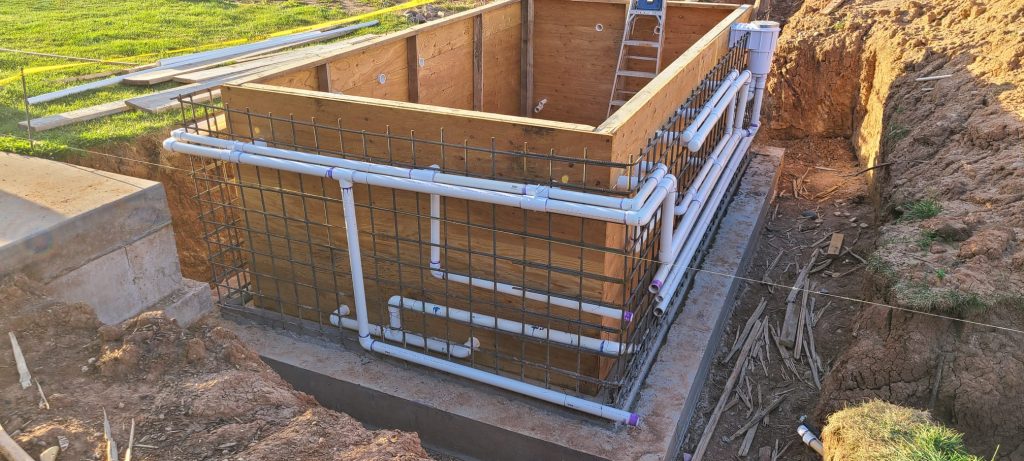
So here you can see a bunch of Gunite bodies going through the walls of what will be a poured diy concrete hot tub wall. You can see them on the other side where they penetrate through. Going into the concrete hot tub are two and a half-inch pipes and that’s the output from the gunite for the actual jet and then, of course, the inch and a half for air and the two inches for water. These go around and interconnect around the concrete hot tub.
Down in the bottom there at the back, you can see three dead-ended pipes on both sides, those are an inch and a half and two-inch pipes coming in that are going to feed gunite bodies that are going to be built into the seats on the interior.
Right there is the light going through there in the center that’s a three and a half or four-inch downsize to 1 inch with the cable running through it for the pool light 12 volt and then this was sort of a mess my pipes weren’t coming in at a 90-degree angle so it created quite a few angles that we had to make so I hope those don’t turn out to be a problem but I think it’ll be just fine.
We also wanted them elevated off of the slab so that the walls could bond to the slab underneath. This is the key way that they built so they put two by fours down in there these are filled with dirt and it’ll be high pressure washed out before they pour so those go about two inches down on either side
Then there’s this water bar which is this rubber thing here and that’s embedded half in the slab and we’ll embed half of the walls to further waterproof things.
This is a control area that will be built into the side of the concrete so the exterior surface will be here and then this will have a few controls in it.
This up here is for the spa top controls that’ll be on top of the pool edge.
Over here is the skimmer. It was a little confusing to me until I started doing it. It’s not too bad the key is you want to make it nice and level. I was trying to figure out how the skimmer controlled the water level and the skimmer doesn’t control the water level. You just want to make sure the water level is about the middle of the skimmer for the most effective use of the skimmer. You control the water level by adding water to it.
There are two sets of returns so you’ll see this return coming forward here goes down and there’ll be two drains more than three feet apart down here so here’s one and you go across and here’s the other connected with a T and they come up into the skimmer and then the skimmer, of course, has its main output back to the pumps here and that’s for safety reasons nobody gets sucked in by the drains.
There’s sort of a view of the inside so the upper ones will be at your back level the lower ones behind your knees with the bench being quite tall around the edges here because we wanted it deep so we could cool it off and swim in it like a plunge pool.
There’s some electricity running over here you can see that wires for the audiovisual system or sort of in this panel everything has to be circuit protected obviously with water.
They do recommend that you bond the rebar to the earth so this is copper bonding the rebar down into this is a copper pin that goes four feet down in the earth for lightning purposes.
So far on the project, the plunge pool / diy concrete hot tub, the walls were poured yesterday morning, finished up yesterday afternoon. They’ve taken off one side on the outside of the forms and ended up taking I think 12 yards of concrete for 15 by 8 by 5 feet deep.
- You can see the amount of structural stuff they had to put in here to offset the weight of the concrete to keep it from bowing pretty impressive the amount of support and I don’t know if you can see it but compared to the foundation it did bow a little bit in the middle here so they’re going to have to come back and grind this center section down to get it perfectly smooth and that’ll happen in a couple of days. You can see all these supports they put in to resist the outward force.
- So the walls ended up being 14 inches thick instead of 12 had we thought about it a little more instead of putting the rebar right in the middle of the wall we should have put the rebar about three inches from the interior wall which would have given us more room for the pipes.
- We had to add additional concrete to cover the thickness of the pipes with insulation and so it ended up being 14 inches we could have done significantly less if we had done that rebar offset. A lesson is if somebody’s ever going to do one themselves to offset the rebar a little bit toward the inner side of the pool.
- You can see again here the support around the outside.
- So this will all be stripped off here in a couple of days.
- The interior they’re going to do a bench around 270 degrees of the interior to sit on and then two lounge chairs built out of concrete down at that far end and then we’re going to have a set of stairs at that far end.
- You’re looking at now to get in and with that, there will also be some recessed receivers for two-inch pipe put into the steps going in so that we can add a handrail if we ever wanted to so those are going to go in.
- And then all of this will be concreted out here to match up with our current concrete and there will be a four-foot sidewalk around the outside of it.
- We’re looking at doing something like this for the coping and then that’s all of our tiles that we’ve already gotten and it’s in the garage ready to go.
- So the concrete has to dry for about 25 days and then we do a test on it, it’s a water absorption test for three days where we put some powder in a sealed container on the concrete you weigh the powder before and after and it gives you a measurement of water per thousand.
- I forgot the unit and that the concrete has to be to a certain dryness before we apply the waterproofing paint on the interior and then just a day or so after that goes on the tile can start going on.
- So they’ll fill all this back in around the outside here and pour the sidewalk here in the next week and pour all of this and start working on the interior benches and at that point, that’ll be the last of my plumbing that has to go in is down there at the far end, I’ll plumb out all the benches with jets and the seats at the far end with jets and I’ve already pre-planned that so down at the far end there at the bottom you can see some jets or some pipes and that’s what I’ll start tying into drains down there at the far bottom coming out of the side and then you can see where the jets will eventually be around the edges here any anywhere those white pipes are.
- The pump house is back there.
- There’s also a control unit box recessed behind this wall that’s about six inches deep and we’ll just have a door over it with some controls in there.
- Over here you can see they did a bump-out around the skimmer and the recommendation is at least four inches around all sides of the skimmer I think we have five on this backside and that went well and it’s perfectly level but this is the bump-out they had to do to get around that and then the last part is this pipe you see sticking out there with the wires that will go through the coping which is two inches thick.
- There’ll be a hole drilled through there and then we’ll etch down into the coping a little bit and there’ll be a spa control panel that fits down in nice and flush with the coping edge and we’re using a balboa system with a spa touch 2C rectangular panel pretty hard to find right now but pretty excited about that for the controls and that’ll control the water flow, the air blowers, light there’s one light in here and temperature.
- Then we’re having a custom-made cover made to cover this size we had to go with aluminum and it’s an interesting product I think it’ll hold up well and it looks pretty good too and has pretty good value but it’ll have four panels so it’ll be split in the middle and they’ll each fold out to one end or the other but they’re about 12 or 15 weeks behind on getting that made so that’ll be coming hopefully by the time we get snow.
- Looks pretty neat we’re debating whether we should just leave the exterior as raw concrete we think that looks pretty nice with the coping versus putting travertine on the outside not sure as it has a pretty ultra-modern look if you step back and we like that look.
I’ll walk you over to the pump house real quick.
- A little bit of an update on that I haven’t finished my work in here, that’s sort of the next step while the concrete’s drying.
- So I did get the Raypack heater in here and you can see the vent stack for that. That was quite a project to get that on and sealed and then I’ve got the right pack in here.
- You can see the ray packs now in position. This is a 266k BTU unit I believe.
- This is propane because we’re out in the country.
- You can see I still have I’ve done the air plumbing back there but I’ve got to do all of the spa and water pumps and everything in here.
This room is 8 by 5 and I’m going to have to be very careful to make sure I have enough room for everything.
- I’m actually going to have to go up to a second-tier so there’ll be stuff on the concrete and then I’m going to build a metal shelf over some of it here and run some of the pipes up and have a little equipment elevated over the other.
- So if you do this it wouldn’t have been hard for me to do another two feet like an 8 by 7 or 10 by 8 or something like 10 by 8 would probably be the best if I had to do it again at least I wouldn’t have to plan quite as carefully I’ll get it all in here but not there yet.
- There’s the chlorine generator on the wall. I’m getting that ready and some audiovisual stuff that we’re going to do but pretty exciting.
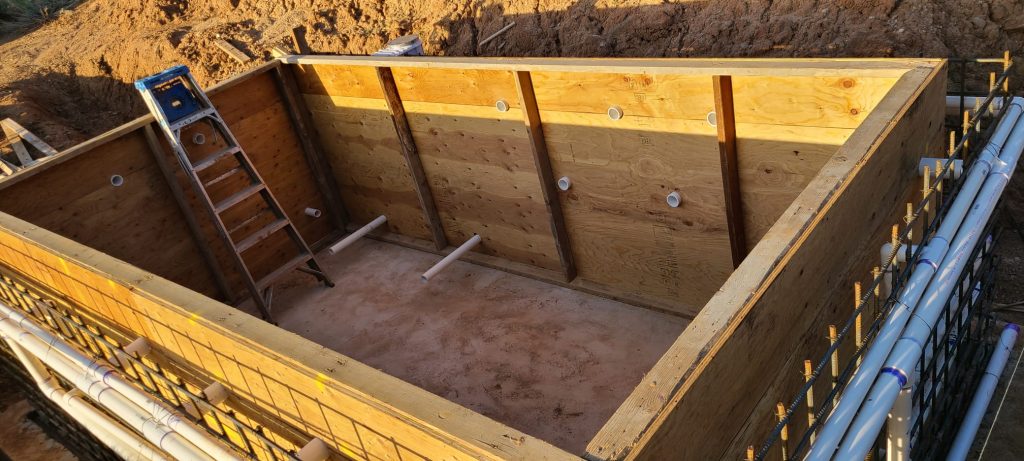
It’s mid-September here in Colorado 2021 and the guys have gotten the framing down from the hot tub.
- The walls are 5ft tall.
- That red line around the side is where the bench is going to go and you can see down below there’s the height of the bench it’ll come out and it’ll go down to that red line there, will be real tall but it’ll put your back so your arms are up over the coping and we decided to build in a little five-inch shelf down below here for your feet so they’re not dangling and you can rest your feet on that.
- And then Freddie the concrete guy wants to angle the seats back a little bit so that you’re less likely to slide off of it.
- These are all our jets I’ve been picking epoxy out of from around here that I put in to give us a gap, cut those off pretty soon, interestingly, some of these have got an angle to them you can see that one has a little more of an angle but it’s fine.
- So jets all the way around there, at the center is the cable that’s pre-plumbed for the light those are returns down there at the bottom same thing around this side so this will be open right here just like it is just covered with tile so you can stand up here put your arms on here and lookout.
- We’re going to have a movie theater screen up there and then coming around here bench, bench, bench and then over in this area on this side and then the same thing on this side is going to be one of these loungers that Andy designed and pretty excited to do that.
- He had designed it so the pipes were originally coming out at the top and working their way down and design-wise it worked better for me to put them at the bottom so these will come straight outcome up at the feet and then they’ll do the curve shape back to the backrest up this way.
- The skimmer came out pretty good. I just took the cardboard off of that but you can see the skimmer there sitting up a little bit so we’ll have to cut a hole in the coping for that should be fine a little bit of crumbly stuff here.
- You can see its five feet deep by eight feet wide by 15 feet long on the interior and the walls ended up being 14 inches thick. So they haven’t backfilled yet around it.
- This is going to be for the spa control on the edge here on the top edge and then you can see our wood there on the outside that’s where some of the control panel stuff would be so that piece of wood will come out and be finished out.
- You can see that bump out to make sure there’s enough concrete outside of the skimmer going all the way around.
- They put sealer around below waterline down there on the bottom that black stuff.
- At this end I’m at now down, at the bottom we will have a bench across between the two loungers and there’s going to be a couple of steps down there, you’ll step from the edge to the bench two steps down into the bottom because it’s quite deep.
- This will have a step on the outside too to get up into it so this end will be the steps in benches all along that side all along, this side opens on the far end and a bench between the two seats down here.
- Those are two returns to long pipes so those are the ones that are tied into the skimmer. From the exterior, all this will come up to the same level as this concrete pad over here where that picnic table is, so this ground elevation is going to be brought up and there’s going to be a four-foot sidewalk around here there and the far side and then this will all be filled in with concrete here.
This is an update on Kyle’s DIY hot tub build which is designed by Andi here at www.buildahottub.com. Here is the latest update.
They’ve poured the interior benches and the custom recliner seats seats.
A few design changes that I had some great concrete guys and they made so you can see that cut back there below the bench and because we did the pool so deep its five feet deep your feet weren’t going to touch the bottom and that would feel a little awkward particularly trying to get up on the seat.
So these guys put that little step there and it was going to be only as wide as it is at the top but one of the guys suggested that we angle it back and so that gives seven inches underfoot at the bottom there and it feels really good a lot better than the five would have so that was a great idea.
And then the seats sloped back about an inch I don’t know if you can see it but actually toward this backside over here that’s a little deeper and a little higher over on the front and that helps too, they’re quite comfortable we’ve been in them already and like the way they feel.
You can see here these are all going to be jets down here at the bottom.
There are two returns right there.
There is where the light is going to go.
Take you over here and show you these seats. These are all based on the specs that Andi gave me and we think they’re really going to work well be really comfortable remember the water will be about four inches down from the edge.
We then ended up adding these steps here at this end for our elderly relatives to be able to get in and out.
That top step our two little girls can sit there between us so that’s going to be really nice.
Those two pipes down at the very bottom are two more returns that connect into the skimmer that you can see over here.
So again the skimmer still have to obviously finish all of this out.
Just to run you through the dimensions again:
The interior dimensions are 15 ft long by 8ft wide by 5ft deep.
The walls ended up being 14 inches thick instead of 12 definitely should have offset the rebar closer to the inner wall so that I had more room for the piping that would have allowed us to use less concrete so keep that in mind if you try and do your own.
We then poured a 4ft sidewalk all the way around that you can see here and then connect it into the path around the house.
So we just got these speakers in that are going to be behind here.
And then the movie screen is going to move over and line up with the hot tub so we’ll be able to sit in our lounge chairs and watch a movie at night which would be really fun.
Still not sure what we’re going to do with the outside we thought for right now we’ll just leave the outside concrete with the travertine coping or two inches thick around the top and then the Interior tile but we could always travertine that or do something else on the outside.
You can see the pump house over there in the background I’m still doing the plumbing for that and that’s getting wrapped up.
In here even though it looks like it’s close to finishing there’s still a lot of work.
So you can see a few defects in different areas like say down in here and we’re going to put mortar in those and fill up any you know sort of large defects like that little one over there.
So that’ll happen first and then the concrete has to cure for three to four weeks to get the moisture content out.
We’re using hydro ban from Laticrete to seal the interior so we’ll put that we’ll either spray or roll that on and it’ll go all the way from the bottom all the way up and over the sides.
So we’ll do it in one direction and let it dry and then turn 90 degrees and do a second coat over that so that’ll be our complete waterproofing.
We’ll also put some waterproofing mesh around each of the jets and then we’ll silicone that mesh to the jet bases to ensure no water moves through around the outside of the pipes, that’s one of the areas I’m most concerned about.
Once the hydra bands are on you just wait a couple of days and then you can start tiling, so then we’ll tile everything we’ll have to cut out around the jets.
The jets of all these pipes will have to be cut flush with the tile.
The one-inch inserts go in the jets.
We’ll have to glue all those together and cut them the right length so they’re flush.
Then the finishing components of the jets will go in. So still a lot of work here is far from done.
Then the coping has to go on and cut out a hole in the coping for the skimmer.
You can see here, this is where the panel will go, the touch screen for the hot tub.
I’m using balboa equipment so I’ll let you know how that works out.
You can now see the equipment boxes open there’s actually just some controls that are going to be in there and that’ll have a cover over it a door.
You can see how this ties into our current slab. You can’t see them really well I haven’t
cleaned them up but these are 3ft deep 3 inches galvanized steel holes here with plugs in them and they’re all around here to do sun sales. So I think that’ll be a neat, possibility there’s another one a little two-inch here that’s not visible yet for an umbrella and then there’s one over here that will be a post to go up to have the projector on so that we can have that right there and go from there.
So there’s your update pretty exciting. I’m getting really close now you can see what it’s going to look like when it’s finished I think it’ll be really beautiful with the small blue tile in there and then the sort of off-white coping around the edges.
Two Years On – the Update 2023
Two years ago, Kyle embarked on a challenging yet fulfilling journey to construct his DIY concrete hot tub, and the fruits of his labor continue to bring immeasurable joy to his family. The hot tub has become an integral part of their daily lives, providing a haven for relaxation, unwinding, and creating lasting memories. Its unique design and sturdy construction have proven to be a wise investment, as the hot tub has weathered the seasons with resilience, displaying minimal signs of wear and tear.
Kyle’s commitment to using high-quality materials and meticulous craftsmanship during the construction process has undeniably contributed to the hot tub’s long-lasting performance. From the carefully selected concrete mix to the precise sealing and waterproofing, every detail has been thoughtfully executed to ensure durability and comfort.
Though the hot tub has been a hit with family and friends alike, Kyle noticed a slight challenge with the air blower. As it was placed a little too far from the hot tub, the blower seemed to be working harder to generate the bubbles. Recognizing the issue, Kyle promptly addressed it by replacing the blower with a more powerful model, effectively resolving the problem. His dedication to maintaining the hot tub’s optimal performance reflects his passion for his creation.
Even with the minor blower replacement, Kyle’s family continues to adore their DIY concrete hot tub. It remains a cherished spot for bonding, laughter, and creating unforgettable moments together. The tub’s inviting waters and soothing atmosphere offer a reprieve from the hustle and bustle of daily life, making it the ideal place for unwinding after a long day or celebrating special occasions.
As the hot tub’s second anniversary approaches, Kyle couldn’t be prouder of his creation. The DIY project has not only added value to their home but also enriched their lives with relaxation and togetherness. With the tub still going strong, the family eagerly looks forward to many more years of enjoyment and rejuvenation in their beloved backyard oasis. Kyle’s DIY concrete hot tub remains a testament to his creativity, determination, and commitment to building a space that brings happiness and comfort to those he holds dear.
What are the design considerations for a Concrete Hot Tub?
When designing a concrete hot tub, there are many factors to consider to ensure that it is both functional and aesthetically pleasing. Here are some of the most important design considerations:
- Location: The location of your hot tub will have a significant impact on its overall design. Consider factors such as privacy, sun exposure, and accessibility when choosing a location.
- Size and shape: The size and shape of your hot tub will depend on the number of people you want to accommodate and the available space. A good rule of thumb is to allow for at least 25 square feet per person.
- Depth: The depth of your hot tub should be comfortable for all users. A good starting point is 36 inches.
- Seating: The seating arrangement of your hot tub should be comfortable and allow for easy movement.Consider factors such as the number of seats, the type of seats, and the placement of seats.
- Jets: Jets are an essential part of any hot tub experience. Consider the number of jets, the placement of jets,and the type of jets when choosing a hot tub.
- Lighting: Lighting can create a relaxing and inviting atmosphere in your hot tub. Consider factors such as the type of lighting, the placement of lighting, and the intensity of lighting.
- Filters: Filters are essential for keeping your hot tub clean. Consider the type of filter, the size of the filter, and the frequency of filter cleaning.
- Cover: A cover will help to keep your hot tub clean and insulated. Consider the type of cover, the size of the cover, and the thickness of the cover.
- Accessories: There are many accessories available for hot tubs, such as steps, handrails, and cup holders.Consider which accessories would be most beneficial for your needs.
By carefully considering these design considerations, you can create a concrete hot tub that is perfect for your needs and will provide you with years of enjoyment.
In addition to the above, there are a few other things to keep in mind when designing a concrete hot tub:
- Concrete mix: The concrete mix you use should be specifically designed for hot tubs. This will help to ensure that the concrete is durable and resistant to cracking.
- Rebar: Rebar should be used to reinforce the concrete. This will help to prevent the concrete from cracking.
- Waterproofing: The concrete should be waterproofed to prevent leaks. This can be done with a variety of products, such as epoxy or sealant.
- Drainage: A drainage system should be installed to prevent water from pooling around the hot tub.
- Electrical: The hot tub should be properly wired and grounded. This will help to prevent electrical hazards.
What is the best size for a concrete hot tub?
The best size for a concrete hot tub depends on several factors, including the number of people you want to accommodate, the available space, and your personal preferences.
Number of People
As a general rule of thumb, you should allow for at least 25 square feet per person in your hot tub. This will ensure that there is enough space for everyone to relax and enjoy the experience.
Here is a table of suggested sizes for different numbers of people:
- 2-3 people: 6′ x 6′ (36 square feet)
- 3-4 people: 7′ x 7′ (49 square feet)
- 4-5 people: 8′ x 8′ (64 square feet)
- 5-6 people: 9′ x 9′ (81 square feet)
Available Space
The size of your hot tub should also be limited by the available space. If you have a small backyard, you may need to choose a smaller hot tub. Conversely, if you have a large backyard, you may have more flexibility in terms of size.
Personal Preferences
Ultimately, the best size for a concrete hot tub is a matter of personal preference. Some people prefer smaller, more intimate hot tubs, while others prefer larger, more spacious hot tubs. Consider your own preferences when making your decision.
Additional Considerations
In addition to the number of people and the available space, you should also consider the following factors when choosing the size of your concrete hot tub:
- The type of hot tub: If you are planning on using your hot tub for swimming, you will need a larger hot tub than if you are only planning on using it for soaking.
- The desired features: If you want your hot tub to have a lot of features, such as jets, waterfalls, and lighting,you will need a larger hot tub to accommodate them.
- Your budget: Larger hot tubs are typically more expensive than smaller hot tubs.
By considering all of these factors, you can choose the best size for your concrete hot tub.
How much does it cost to build a concrete hot tub?
The cost of building a concrete hot tub can vary depending on several factors, including the size of the hot tub, the materials used, the labor costs, and the permits required.
Size
The size of the hot tub is the most significant factor affecting the cost. Larger hot tubs require more materials and labor, so they will be more expensive to build. A small hot tub might cost as little as $5,000, while a large hot tub could cost upwards of $50,000.
Materials
The type of materials used will also affect the cost. Concrete is a relatively inexpensive material, but it can be challenging to work with. If you are not experienced with concrete, you may need to hire a professional contractor, which will increase the cost.
Labor
Labor costs will also vary depending on the location. In urban areas, labor costs are typically higher than in rural areas. You can expect to pay between $20 and $50 per hour for labor.
Permits
In some cases, you may need to obtain permits to build a concrete hot tub. The cost of permits will vary depending on the location.
Additional costs
In addition to the costs mentioned above, you should also factor in the cost of:
- Excavation
- Concrete forms
- Plumbing
- Electrical
- Finishing materials
DIY vs. Professional Installation
If you are handy, you may be able to save money by building the hot tub yourself. However, it is important to note that building a concrete hot tub is a complex and time-consuming project. If you are not confident in your abilities, it is best to hire a professional contractor.
Here are some tips for saving money when building a concrete hot tub:
- Do your research and plan carefully.
- Shop around for materials and labor.
- Consider using recycled materials.
- Do some of the work yourself.
- Get multiple quotes from contractors.
By following these tips, you can save money and build a beautiful and durable concrete hot tub that you can enjoy for years to come.
How do you seal a concrete hot tub?
Sealing a concrete hot tub is an essential step in protecting it from damage and ensuring its longevity. Here’s a step-by-step guide on how to seal a concrete hot tub:
Step 1: Clean the Surface
Before applying any sealant, it’s crucial to clean the concrete surface thoroughly. Remove any dirt, debris, or grease using a mild detergent solution and a stiff-bristled brush. Rinse the surface thoroughly with clean water and allow it to dry completely.
Step 2: Acid Etch the Concrete
Acid etching helps to create a porous surface that will allow the sealant to bond properly. Use a commercial concrete acid etching solution according to the manufacturer’s instructions. Apply the solution evenly to the concrete surface, allowing it to work for the recommended time. Rinse the surface thoroughly with clean water to neutralize the acid and allow it to dry completely.
Step 3: Choose the Right Sealant
Select a high-quality sealant specifically designed for concrete hot tubs. Look for a sealant that is resistant to water, chemicals, and UV rays. Some popular options include penetrating concrete sealers, acrylic sealers, and epoxy sealers.
Step 4: Apply the Sealant
Apply the sealant to the dry concrete surface using a roller or brush. Work in small sections, ensuring even coverage and avoiding excessive pooling of sealant. Allow the first coat to dry completely according to the manufacturer’s instructions.
Step 5: Apply a Second Coat
For added protection and durability, apply a second coat of sealant. Follow the same application method as the first coat and allow it to dry completely.
Step 6: Maintenance
Regular maintenance is essential to prolong the life of the sealant and protect your concrete hot tub. Reapply sealant every two to three years, or more frequently if needed. Inspect the sealant regularly for cracks or wear and tear.
Additional tips for sealing a concrete hot tub:
- Work in a well-ventilated area and wear protective gloves, goggles, and a mask.
- Follow the manufacturer’s instructions carefully for each product you use.
- Apply sealant in mild weather conditions, avoiding extreme heat or cold.
- Allow ample time for each coat to dry completely before applying the next.
- Store unused sealant in a cool, dry place according to the manufacturer’s recommendations.
By carefully following these steps and maintaining your concrete hot tub, you can ensure it remains protected and enjoyable for years to come.
Can I Help You?
If I can help you in any way I would love to hear from you. You can get in touch using the form below.
Thanks - Andi
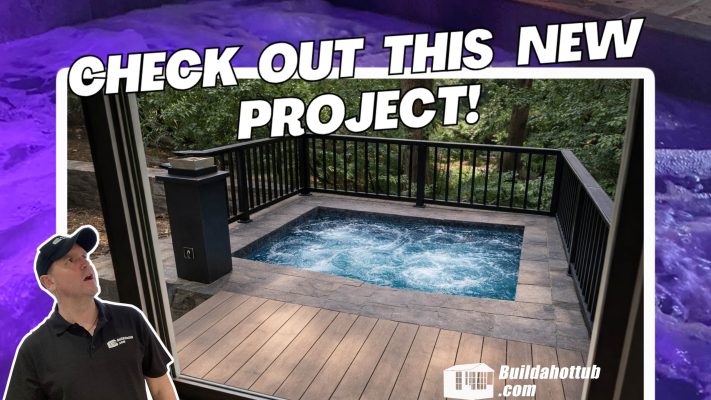
Can a Self-Confessed Rubbish DIYer Build a Hot Tub? Meet Matt
his might just be the biggest challenge my DIY hot tub plans have ever faced. [...]
Jun
What I’d Change If I Built My DIY Hot Tub Again
Around eight years ago, I built my own DIY hot tub. You've probably seen it [...]
May
Out With the Cedar, In With an ICF Inground Hot Tub
Right, I've got a brand new project to introduce to the channel today – and [...]
Apr
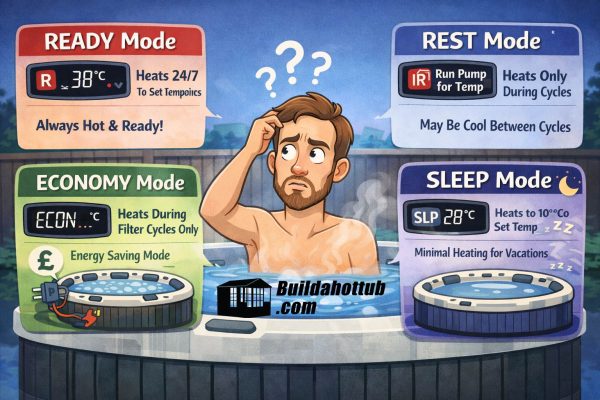
Balboa Heat Modes Explained: Ready, Rest, Economy and Sleep — What They Actually Mean
If you've got a Balboa-controlled hot tub and you're not sure what all those heating [...]
Mar
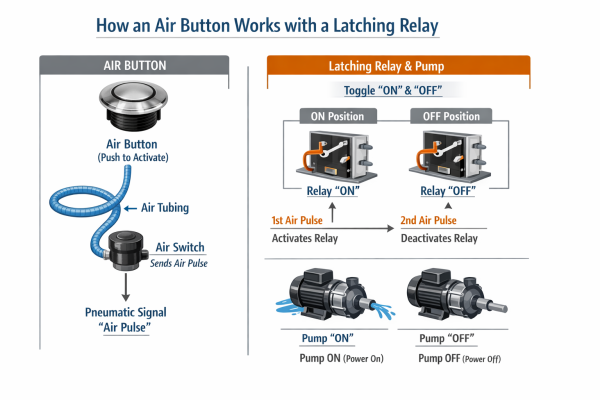
How to Change an Air Button and Latching Relay on a Hot Tub, Pool or Spa Bath
If you've got an air button that's stopped working, or a latching relay that's given [...]
Mar

How to Choose the Right Air Source Heat Pump for Your Hot Tub or Pool
With so many air source heat pumps on the market right now, choosing the right [...]
Mar
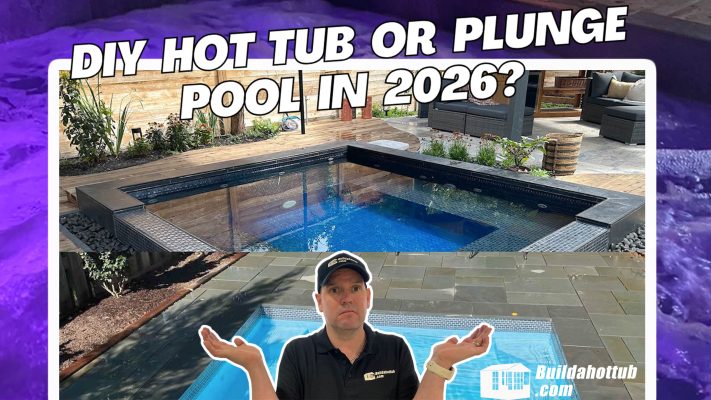
Hot Tub vs Plunge Pool – Which Should You Build in 2026?
Right, this is one of those questions that lands in my inbox on an almost [...]
Mar
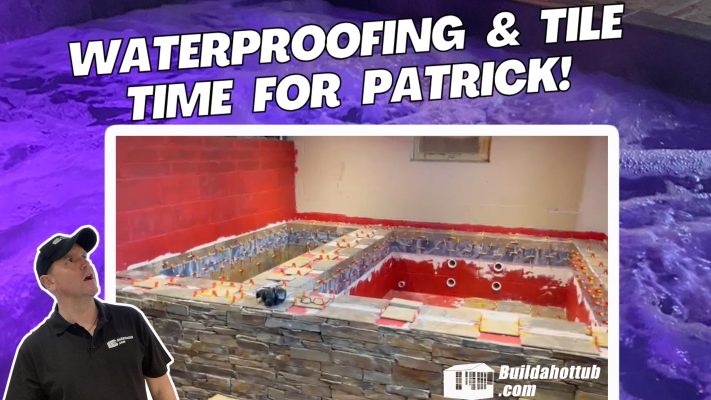
Patrick’s Wisconsin Basement Hot Tub & Cold Plunge – Waterproofing, Tiling & a Surprise Water Feature!
We're back with another update from Patrick in Wisconsin, and this one is a big [...]
Feb