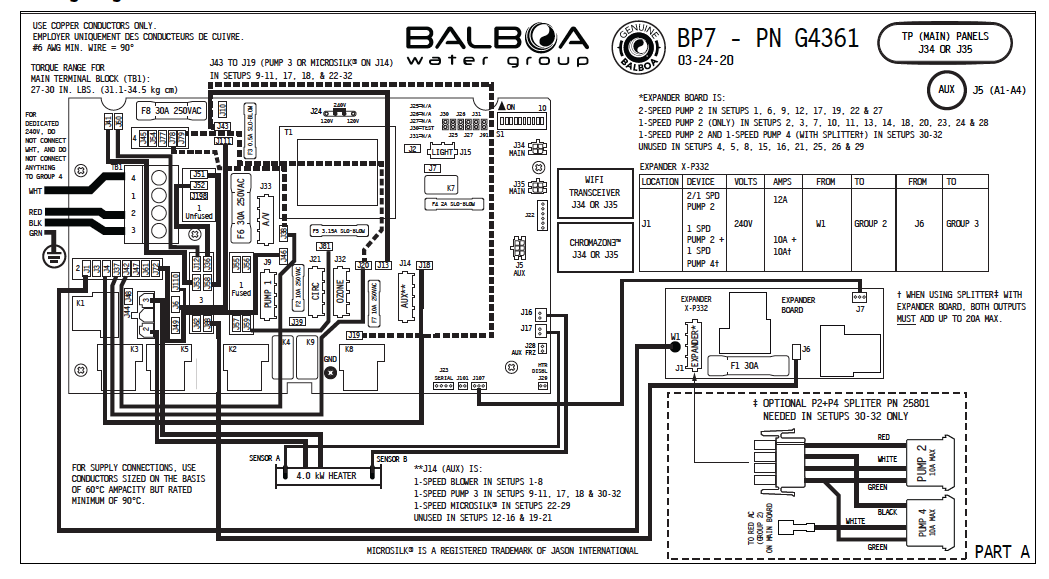
Have you ever stared at a spa pack wiring diagram, feeling utterly lost? You’re not alone. Those intricate schematics can be daunting even for seasoned hot tub owners.
But fear not, for this blog post is here to guide you through the labyrinth of wires and symbols. I’ll delve deeper than ever before, building upon the valuable foundation provided by my video below “Spa Pack Wiring Diagrams Explained.”
You can also find me on my socials;
Understanding the Spa Pack: The Control Center of Your Hot Tub Oasis
Imagine your hot tub as a bustling city. The spa pack, nestled within its core, acts as the central control center. It’s the mastermind behind all the luxurious features you enjoy, from the invigorating massage jets to the soothing warmth. But just like a city relies on a complex network of roads and utilities, the spa pack requires a well-defined wiring scheme to function flawlessly.
Decoding the Blueprint: Key Components Explained
The wiring diagram serves as the blueprint for this intricate network. It visually represents the electrical connections between various components within the spa pack. Here’s a breakdown of some key elements you’ll encounter:
-
Power Input: The diagram depicts the incoming lifeblood of your hot tub – the power supply. Typically, it’s a dedicated 230-volt line for optimal performance and safety. Builderhottub rightly emphasizes the importance of consulting a qualified electrician for any electrical work related to your spa pack. Their expertise ensures your hot tub is wired correctly, adhering to safety regulations and preventing potential hazards.
-
Voltage Configuration: A hidden gem within the video is the explanation of voltage configuration, particularly for Balboa spa packs. These packs offer the flexibility to adjust voltage settings for specific components like pumps and the ozone generator. Tiny switches on the circuit board called jumpers determine this configuration. By consulting the manual and following the manufacturer’s instructions, you can ensure each component receives the appropriate voltage for optimal performance and longevity.
Setting Up Your Spa Pack: Planning and Programming
Before you dive into the wiring itself, a little planning goes a long way. Here’s how to approach spa pack setup with confidence:
-
Matching the Mastermind to Its Minions: First things first, identify all the components connected to your spa pack. This includes pumps (circulation and jet pumps), the blower for air bubbles, and the heater. A common pitfall is overlooking a dedicated circulation pump, so be sure to factor that in during the planning stage.
-
Programming the Perfect Match: Once you’ve identified your team of components, it’s time to program the spa pack to recognize and manage them effectively. Different control panels may have varying programming methods, but the video offers valuable insights into Balboa packs. Typically, you’ll consult the manual and use a specific key press combination to select a configuration that flawlessly matches your exact combination of components.
Dip Switches: The Tiny Tweaks That Make a Big Difference
The unsung heroes of the spa pack world are the dip switches. These tiny switches, often located on the circuit board itself, allow for specific configuration changes. The video sheds light on Balboa pack dip switch settings, explaining how they can be used for tasks like limiting current draw to prevent overloading or resetting the spa pack to factory settings. By understanding how these dip switches function, you can gain more control over your hot tub’s behavior.
Understanding the Circuit Board Diagram: Where the Magic Happens
The circuit board diagram translates the cryptic language of electrical connections into a visual representation. It illustrates how different inputs on the spa pack are utilized based on the chosen configuration. For instance, the auxiliary input (J14) might be used to power the blower in certain settings, while in others, it might serve a different purpose. By studying the diagram and referencing the manual, you can gain a deeper understanding of how electricity flows within your spa pack.
Cable Connections and AMP Connectors: Mastering the Electrical Language
The video emphasizes the importance of connecting cables to the correct pins on the circuit board. It’s crucial to ensure proper polarity to avoid electrical malfunctions. AMP connectors, commonly used for these connections, have a flat side. Remember, this flat side on the connector needs to match the flat side on the cable to prevent incorrect polarity. The ground wire typically goes on the top for AMP connectors where the flats are on the right. I recommend consulting some of my separate resources for detailed information on cable connections and pin configurations specific to your spa pack model.
Beyond the Video: Additional Tips for Success
While the video provides a fantastic foundation, here are some additional tips to ensure a smooth and safe spa pack wiring experience:
- Safety First, Always: This cannot be stressed enough. Always turn off the power to the spa pack at the breaker box before attempting any electrical connections. Working with live electricity is dangerous and should only be done by qualified professionals unless you possess the necessary
Can I Help You?
If I can help you in any way I would love to hear from you. You can get in touch using the form below.
Thanks - Andi
 Hi, Andi here. I own Buildahottub.com and also write all of the articles and info pages on the site. Some years back now, I built my own hot tub but struggled to find the information I needed. So, once my tub was complete, I started this website to help others in their own pursuit of hot tub and plunge pools DIY building information.
Fast forward to 2025, I've helped over 1400+ DIY customers just like you all over the world build hot tubs and pools. Have a good look around the site, there are lots of resources here. Please do get in touch if I can help you. - Cheers, Andi

