In a previous video, I walked you through how to replace a spa pack heating tube. But what if your heating tube is in good shape, and you only need to replace the heating element in your Balboa spa pack?
No worries! Here’s an easy step-by-step guide for replacing your spa pack heating element. In this guide, we’ll be working with a Balboa spa pack that has an M7 heating unit located at the bottom.
You can also find me on my socials;
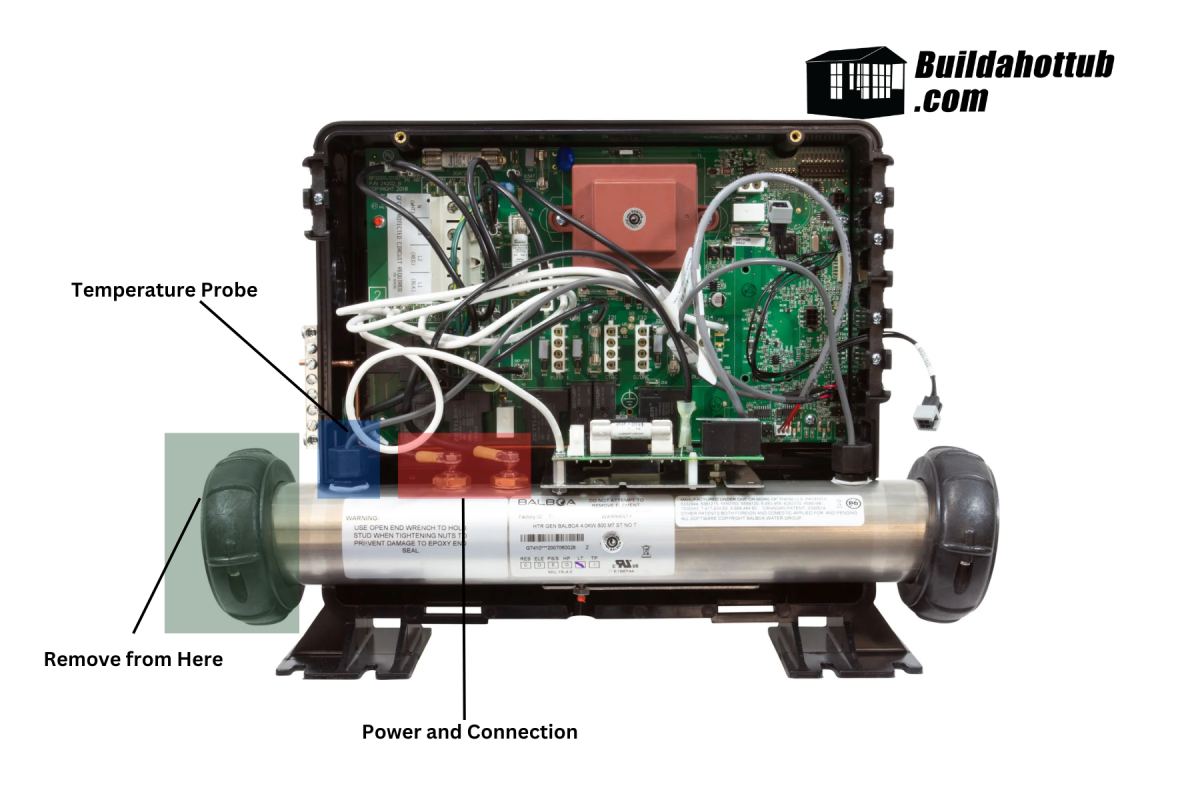
We’ll refer to the image below to help you understand each component.
Removing the Heating Element
Removing the heating element is a straightforward process that can be completed in just three simple steps.
Step 1: Disconnect the Power Cables
Begin by removing the power cables from the heating element. To do this, unscrew the top of the power unit, then carefully disconnect the two power connectors.
Step 2: Remove the Temperature Sensor
Next, use a wrench to loosen and remove the temperature sensor from its housing.
Step 3: Extract the Heating Element
Finally, reach in from the side and pull out the heating element. In the example video above, we’re using a brand new element, but if you’re looking for a replacement for your hot tub, you can check out our selection here.
Reinstalling the Heating Element
Now that the old element is out, let’s reinstall the new one using the same three steps in reverse order.
Step 1: Insert the Heating Element
First, carefully insert the new heating element, making sure to align it with the mounting holes. This can be a bit tricky, so take your time. Once aligned, prop it up slightly and secure it in place with washers and bolts.
Step 2: Reinstall the Temperature Sensor
Next, drop the temperature probe back into its housing and tighten the bolt around it to secure the connection.
Step 3: Reattach the Power Cables
Finally, reconnect the power cables by placing them in their respective positions and bolting them down.
And that’s it! You’ve successfully replaced your hot tub spa pack heating element.
If you have any questions or need a replacement heating element, feel free to reach out to me or check out the parts available on my website!
Can I Help You?
If I can help you in any way I would love to hear from you. You can get in touch using the form below.
Thanks - Andi
 Hi, Andi here. I own Buildahottub.com and also write all of the articles and info pages on the site. Some years back now, I built my own hot tub but struggled to find the information I needed. So, once my tub was complete, I started this website to help others in their own pursuit of hot tub and plunge pools DIY building information.
Fast forward to 2025, I've helped over 1400+ DIY customers just like you all over the world build hot tubs and pools. Have a good look around the site, there are lots of resources here. Please do get in touch if I can help you. - Cheers, Andi


