
I’ve been in the hot tub business for years now it’s been such an incredible journey. I’ve worked on hundreds of builds, and helped thousands of others get their DIY hot tubs off the ground. So naturally I made a lot of mistakes along the way.
This is why I started buildahottub.com and the YouTube channel. To help people build their own DIY hot tubs and avoid the mistakes that I made. Which is why, In this blog post, we’ll look at the top 7 mistakes that I made when starting off, so hopefully, you won’t make the same ones.
Mistake#1: Don’t Make the Hot Tub Too Big
The first mistake I made was attempting to build a hot tub that was too big. It might seem strange, but you can’t just make a hot tub as large as you want. Heating becomes a major concern.
In my case, I was planning to use electric heating – I had this in mind from the start. My initial designs had a water volume of over 3000-3200 litres, which is a huge amount of water to heat effectively.
To solve this, I scaled back the design to ensure it stayed within the limits of the 3 kW heater I was planning to use for my own build. In most European and UK builds, a 3 kW heater is common, while in the United States, a 5.5 kW heater is typically used for heating a hot tub via electric.
To put things into perspective, the pool supplier initially suggested a 12 kW heater for the original volume of water I had planned, which is enormous!
So, the first mistake I made was trying to make the hot tub too large.
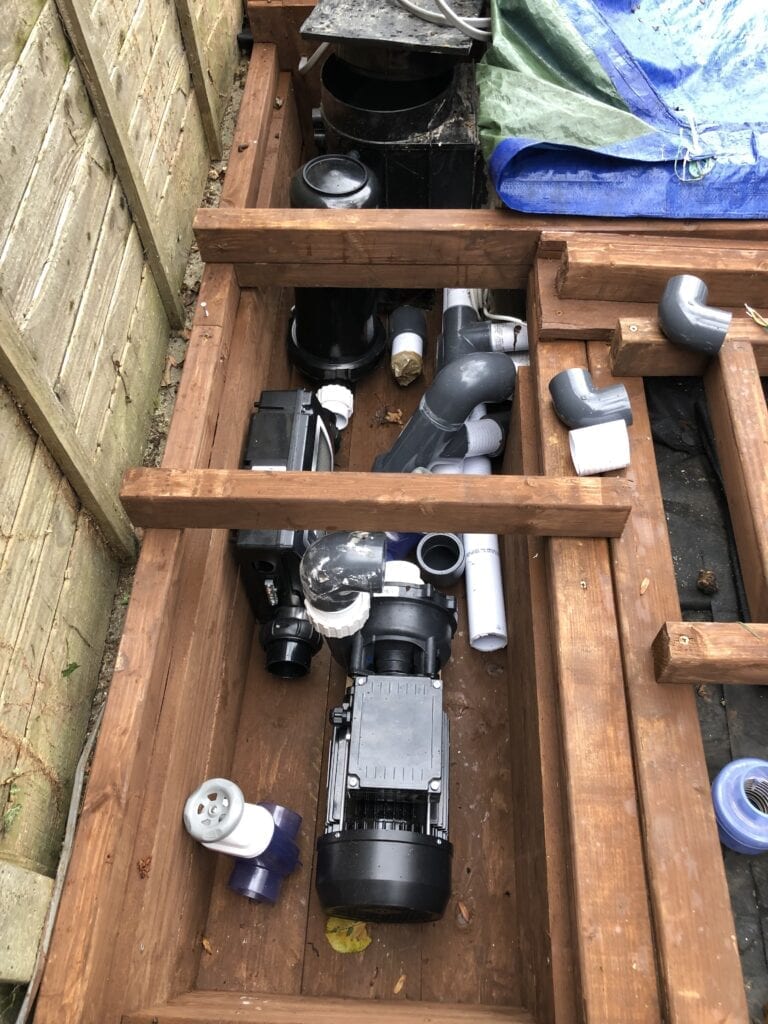
Mistake#2: Don’t Make a Small Control Room
The next mistake was with the control room – if you’ve read my blogs or watched my videos, you’ll know I talk about this a lot. Even today, it’s still extremely annoying when I need to change the filter, and it’s difficult to access the control room and all the parts inside.
If I could give you one piece of advice, it would be: make the control room larger than you think you’ll need. This will give you easy access to service the pump, check the heater, and change the filter.
You really want to have easy access to these components. So, the second mistake I made was making the control room way too small.
Mistake#3: Don’t do things Too Quickly – Don’t Rush!
The third mistake was rushing – I was trying to do things too quickly. Especially with the plumbing, if you make the joints properly, they won’t leak. Take your time and make sure you’ve got a full inch of pipe inside the fittings, and they will stay leak-free.
However, if you rush and don’t do the joints properly, they will leak. It’s that simple. Unfortunately, that’s exactly what happened with my own build.
I always advise my customers to take their time, do things slowly, and ensure that the joints are done properly. If you make good joints, you won’t face any leaks later.
The kit we use is high quality, so if the joints are done right, you won’t have to deal with issues down the line.
It’s much harder to repair a leak than to make a good joint from the start!
Mistake#4: Don’t Skip Reading Instructions
The next mistake I made was not reading the instructions that came with the spa pack. I know, we don’t like reading instructions. (I’m sure many females will say they always read them, but us males like to think we know it all).
I didn’t read them, and it ended up costing me. By not reading the instructions and failing to check the current draw on the hot tub light, I plugged in my non-standard hot tub light into the control pack, which ended up drawing too much current.
What I didn’t realize was that I was blowing the control board. It became quite an expensive habit because those control boards cost around $300 each, and I was going through them quickly!
Again, take your time, check everything, and read the instructions carefully. Also, check the current draws. Of course, if I’m supplying you with the parts, I’ve already checked that for you, so I can assure you that everything will work.
But don’t make the mistake I did. It was quite costly.
You might think I’m advising you on how to build a hot tub when I made all these mistakes myself. But the truth is, we all learn from our mistakes, and I made quite a few in my build. Fortunately, I can help you avoid making the same ones!

Mistake #5: Don’t Worry About Using Joints
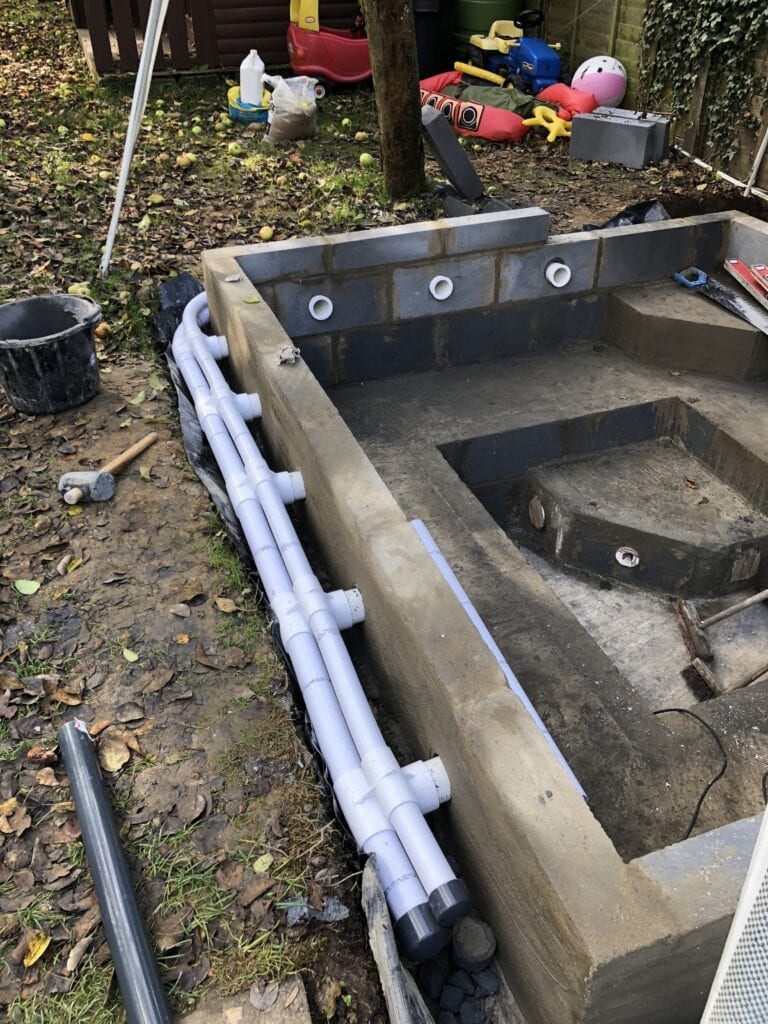
The next mistake I made was trying to avoid joints with the pipes. It may sound a bit odd, but I was trying to bend the pipes around corners instead of using 90-degree elbows.
In my mind, I thought that by having fewer joints, I would have fewer chances of leaks. The reality, however, was that bending those pipes meant they wouldn’t fit properly into the fittings, and they ended up leaking. I had to take them out and replace them.
So, when you’re making or designing your plumbing (and of course, I can help you with this), make sure to include those 90-degree angles. It will save you time and effort in the long run!
Mistake #6: Don’t Force the Pipe If It’s Not at the Correct Angle
The next mistake is almost related to the previous one: keep within the angles of your joints. What I mean by this is that fittings come in different angles, like 90-degree elbows or 45-degree elbows. Stick to those angles, and don’t force the pipe if it’s not at the correct angle.
I used semi-flexible pipe, which isn’t as flexible as it sounds (if you’ve seen my previous blogs and videos). What I did was have the lower drains coming in with this kind of flexible pipe, but that wasn’t the right approach. Instead, I should have stuck to the angles – 90 degrees in each direction.
What ended up happening in my control room was that where the pipes met, they were not at the right angle. This left me with pipework all over the place.
So, keep your pipework parallel, and always stick to the correct angles (90 or 45 degrees) for your joints. It will make your life easier, and most importantly, fewer chances of leaks in your hot tub plumbing!
Mistake #7: Keep Your Pipes as Perpendicular As Possible
The final mistake I made with my build was not taking the time to get the Gunite bodies flush and perpendicular to the surface. This became a problem when I fitted the wall niche and eventually the jets—they had slight angles and didn’t fit completely flush to the wall.
My suggestion is to keep your pipes as perpendicular as possible when they come out of the walls. This ensures they’re properly sealed so that when you install the jets, they’ll be perfectly flush with the wall.
Now, it doesn’t actually matter if the jet isn’t totally flush to the surface; it won’t affect the functionality. What happens is that air escapes from the back of the jets when your blower is running, but when the jets are full, you won’t notice. It’s not the end of the world if your jets aren’t perfect.
That said, if you can achieve a nice perpendicular finish for your jets, you’ll avoid issues down the line, and your project will have a polished, professional look.
Thanks for reading!
looking for hot tub & pool parts?
I have everything you need....
If you are looking for Hot Tub & Swimming Pool Parts, either for your DIY Hot Tub, plunge pool or swim spa build, or you are looking for parts to repair your pool or hot tub - then check out my USA & UK stores below.
I carry 30K+ product lines across the stores
![]()
Can I Help You?
If I can help you in any way I would love to hear from you. You can get in touch using the form below.
Thanks - Andi
 Hi, Andi here. I own Buildahottub.com and also write all of the articles and info pages on the site. Some years back now, I built my own hot tub but struggled to find the information I needed. So, once my tub was complete, I started this website to help others in their own pursuit of hot tub and plunge pools DIY building information.
Fast forward to 2025, I've helped over 1400+ DIY customers just like you all over the world build hot tubs and pools. Have a good look around the site, there are lots of resources here. Please do get in touch if I can help you. - Cheers, Andi
How to Change an Air Button and Latching Relay on a Hot Tub, Pool or Spa Bath
If you've got an air button that's stopped working, or a latching relay that's given [...]
Mar

How to Choose the Right Air Source Heat Pump for Your Hot Tub or Pool
With so many air source heat pumps on the market right now, choosing the right [...]
Mar
Hot Tub vs Plunge Pool – Which Should You Build in 2026?
Right, this is one of those questions that lands in my inbox on an almost [...]
Mar
Patrick’s Wisconsin Basement Hot Tub & Cold Plunge – Waterproofing, Tiling & a Surprise Water Feature!
We're back with another update from Patrick in Wisconsin, and this one is a big [...]
Feb
Key Considerations for Building a DIY Hot Tub in 2026
So, you're thinking about building a DIY hot tub in 2026? Well, you've come to [...]
Feb
The Kansas Craftsman Who’d Never Built a Hot Tub (Until He Built One Better Than Most Pros)
Sure, he'd built plenty of things. Deck? Check. Workshop? Done. Custom furniture? No problem. But [...]
Dec
DIY Hot Tub and Cold Plunge Build: Patrick’s Wisconsin Basement Project Update
Building your own hot tub is an ambitious project that many homeowners dream about, but [...]
Sep

Where’s he been?
I know, it's been an age since I have created some new content. Have a [...]
Aug