

If you are thinking about building a Horse Trough Hot Tub or even a Horse Trough Pool, then you must read this article first! In this blog post we are going to discuss the pros and cons of building your own Horse Trough Hot Tub or Pool.
We’ll tell you exactly how to do it and compare it against the concrete block method that I used to build mine. If you already have your mind set on building a Horse Trough Hot Tub I will explain exactly how to build one!
If you want to jump to the instructions for how to build a Horse Trough Hot Tub, click here.
A Bit of Background
At time of writing, it’s almost two years since I broke ground on my DIY Hot Tub Build. Two years on, the family and I still love it. We still use it 3-4 times a week and it was a great project to undertake.
If you have read this blog before the whole idea of it was to put all of my new found knowledge into one place. I didn’t know anything about this subject matter two years ago!
Now, I’ve just discovered that there is a type of DIY Hot Tub that I had not heard of before – Horse Trough Hot Tubs. Therefore, I thought I would do some investigating and see if I can draw up some pros and cons and conclude if it is a good idea or not.
What is a Horse Trough Hot Tub?
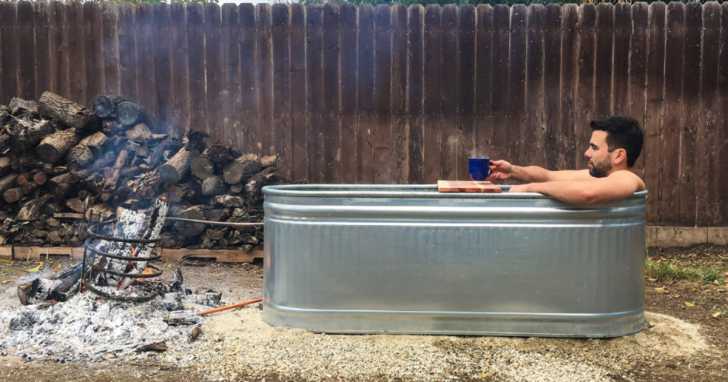
Photo: Youtube / HomemadeModern
Let’s start with the Horse Trough. What is one of these? According to Wikipedia, “A stock tank or Horse Trough is used to provide drinking water for animals such as cattle or horses. Horse Trough can range in size from 100 L to over 5500 L and typically are made of galvanized steel. These tanks are filled either by a pump, windpump, creek, spring, or even rely on runoff water from rain or melting snow.”
OK, so now we know what one of these is. It’s a big steel vessel that can be filled with water.
Given that it is designed to hold water, no wonder people are converting these into Hot Tubs.
What are the Drawbacks of Horse Trough Hot Tubs and Pools?
Affectionately known as “hillbilly hot tubs” these tubs can certainly be affordable and it is easy to see why I am sure they will be once again very popular this summer.
However, there are a few drawbacks.

Slime and Algae
This is of course the general problem with standing water. It is going to develop slime, algae along with lots of other bacteria. Yes, it is possible to combat this with chemicals, but as the water is standing, it makes life a lot harder.
Lack of Filtration
Filters are part of what keep our Pools and Hot Tubs looking clean, clear and inviting. They remove debris from the water. With the lack of filtration in a Horse Trough Hot Tub you are going to get a build up of debris. You are going to have to try and work a lot harder with the chemicals to keep that water clean, clear and most importantly safe.
Needs lots of Chemicals
As we have mentioned above, there is not filtration. Yes, you can do this manually with a net to get the larger particles out of the tub, but you are going to need a lot of chemicals to keep the water clean, clear and safe.
What about Rust?
Rust is going to be a problem so you are not for example going to want to drop your Chlorine tablets directly into the tub. There is no skimmer to put them in so you will need a floating device. Rust is going to be a problem and the amount of chemicals you are going to be adding to the tub is going to speed this process up.
Standing Water = Mosquitos
I guess it is inevitable. Depending of course which part of the country you are in, your standing water in the Horse Trough Hot Tub is going to attract insects and mosquitos. If, like me, you are not so affected by bites it is not a problem. My wife on the other hand, this would be a non-starter for her as she reacts so badly.
Takes Forever to heat as need a Fire first!
It is not going to be the most convenient of ventures. You need to build a fire, let it heat up before you can then heat the water. The idea of going for a “quick dip” isn’t really going to work.
Uncomfortable?
I am sure that this is very much a personal preference thing, but they don’t look the comfiest. Surely, the whole idea of a Hot Tub is being able to kick back, relax, have a glass of something and let the woes of the world pass you by. Can you do this by being almost bolt upright in a Horse Trough? Not sure – I’ll let you be the judge of that.
Jets and Bubbles?
One of the big lures of the Hot Tub is the bubbles and jets that spray water around the tub creating a relaxing atmosphere. One could therefore argue, that a stock tank hot tub, without “jets and bubbles” is really just an outside bath! Yes it is possible I am sure to plumb in jets, heaters, filters and everything else. If you are going to go that far you might as well build you own in the same way I did. If you have the skills to plumb in a Horse Trough, you have the skills to build something a little more substantial.
What is the Alternative to a Horse Trough Hot Tub or Pool?

The alternative is a Concrete Block or Cinder Block pool, like the one that I have made. It will take you a little longer to build. It will cost a little more to make. It will also cost a little more to run. But, what you end up with a a PERFECT Hot Tub that rivals and arguably trumps the plastic shell type, or indeed the inflatable Hot Tubs that are available on the market.
How to build the Ultimate Horse Trough Hot Tub
In the interest of balance here, if you read the article so far you will have thought that I am against building a Horse Trough hot tub. So I sat down, had a couple of cold beers and thought, well, what if I came up with the ultimate design for a Horse Trough Hot Tub that addresses all the negative points above. OK, so it is not going to be a cheap as a traditional stock tank hot tub, but it will still be cheaper than a concrete block tub and arguably quicker and easier to do.
Where do I start with my ultimate Horse Trough DIY Hot Tub design?
The first thing that I wanted to do with the design is address pretty much all the cons or negative points that I have raised in the article above. Jets, heater, filtration and a pump. Add these into the mix and we have the beginnings of the ultimate DIY Horse Trough Hot Tub.
We will not have to worry about standing water, slime, algae, lack of filtration and building a fire to heat it. We’re going to build a the ultimate DIY Horse Trough Hot Tub by using the stock tank as the water vessel and then adding all the plumbing to make it a full on hot tub.
It will be cheaper than using concrete blocks. Less skills needed. No need to dig a big hole first or to worry about the capacity of the vessel to hold water – that is what its job is!
Some of the parts however have to change. The Gunite bodies which I am some enamoured with have to change as they are not suitable for this kind of build. The biggest challenge is going to be to make sure that the Horse Trough does not leak where we are going to cut holes for the jets and the skimmer. Nothing that a tub of epoxy resin or similar plumbing adhesive will not fix.
So first things first, let’s take a look at the Horse Trough we are going to use for this build.
The Horse Trough (to be converted into a Hot Tub)
I found one on Amazon, I’m not going to put a link as I am not an affiliate you can easily search for it. You can get one of these from anywhere. The one that I saw was roughly 6ft in diameter (1.8m) and 24″ tall (60cm). It holds approximately 340 gallons of water. This will be slightly less as we will not be right up to the top on this one. As there is no seating, we don’t need to worry that it is not quite as deep as the rest of the designs that we have.

Image Credit – Behlen Country Farm and Ranch Equipment
The volume is a little bit less so we can spec down the pump and the jets if we wish. However, I like the idea of a 16 jet system with seating for 4 in this tub so I am going to specify 16 jets and a pump that can cope with this. Any Hot Tub according to BISHTA needs to have at least two drains to make sure there is adequate flow to the pump so we’ll design in 2 drains for this too. The skimmer we’ll use a regular pool skimmer. Spa Pack for the heater and pump control and also the filter to keep that water crystal clear.
Not its time to do some research on the parts needed for out DIY Horse Trough Hot Tub
Plumbing Parts
We’re a bit more used to concrete block tubs here at buildahottub.com but we liked the idea of the challenge of designing the ultimate Horse Trough hot tub. We’ve already mentioned you can’t use Gunites but we did find some jet bodies that were more suitable to commercial applications, but we think will work nicely on the Stock Tank.
Being able to seal them up to the surface is going to need some form of epoxy resin around the edges of each jet, more than likely on both sides of the metal to ensure that there are no leaks. The beauty of the Horse Trough is that you are going to be able to see the plumbing have have comfortable access to it. If there are leaks, you can plug them with plumbers mait or more epoxy resin – both of these materials will set under water. (I’ve used them myself of my own top to repair a corner that came loose)
The pipe that we are going to use is 1″ and 1.5″. The particular jet bodies that we have found take a 1″ pipe but the filter is a 1.5″. Nothing too complicated here as we are going to use converters to take us up and down the pipe thicknesses. Remember, the pump is probably going to be a 2″ in and out so we’ll need a converter there too.
We can use the same style of drain that we have used on the concrete tubs. The reason for this is that the drains are actually designed for more of a shell-like tub which our stock tank will fall into.
The skimmer is going to need to be placed and held in place with some epoxy resin or more plumbers sealant.
Now it is time to put the plumbing diagram together. If you would like a full plumbing diagram, this is just a screen grab, you can purchase this in the shop. It also comes with a full list of parts that you need to make this work.

The Control Room
The “Control Room” setup that we are going to use for this Ultimate Stock Tank Hot Tub design, is going to be the tried and tested setup we use on all our concrete builds. It comprises of a pump, filter, blower and spa pack.
The Spa Pack controls the heating of the water as well as the filter cycle and the pumps. It’s a clever piece of kit. What it also means is that we are going to be removing some of those negative points we mentioned earlier, usually associated with stock tank Hot Tubs.

This particular setup that we have built for a customer is using only the highest quality of parts from top USA brands Balboa and Waterway. It is totally possible to replace some of the these parts with cheaper ones to bring down the cost of your Stock Tank Hot Tub.
The two gate valves are to enable you to isolate the components for changing the filter and also servicing any of the parts if you need to remove them from the system without draining your stock tank.
Time to cut some holes!
For this Ultimate Horse Trough DIY Hot Tub, we’re going to use 16 jets, 2 lower drains and a skimmer. This setup is going to replicate the setups that we have put together for many different brick and cinder block designs. The whole idea of this ultimate design is that it addresses all the questions and negative points usually associated with Stock Tank Hot Tubs.
The sides of the stock tank are obviously metal, but they are not too thick that a hole cutter cannot be used to cut the size. The exact sizes full list of parts and designs are available for you to buy from our shop.
The jet bodies are a little different that we are going to use on this Horse Trough hot tub. The ones that we talk about called Gunites are not suitable for this kind of build. We are still going to go with a mix of air and water to give the ultimate hot tub experience in a Horse Trough!
Secure the Jet Body In Place
Once you have the hole drilled, you are going to need to secure the body in place. Sealing it in is the most difficult part of this build. The tub itself is already water tight, that is what it is designed for. Therefore, the holes that you cut you need to ensure that you are going to seal them correctly.
You can find many examples on the internet that have hoses going into the tub from the top. These have no jets and are really just outdoor bath tubs. We want to have some proper “Hot Tub activity” in terms of jets and bubbly water.

Here is an example of a jet that has been cut into the side of the Stock Tank.

I would suggest some form of epoxy resin that can bond to both metal and the plastic. You will need the PVC pipe cement to make the joints on the regular pipework, but for each of the 16 jet bodies and the two lower drains, plus the skimmer, you need to have some form of epoxy resin to bond and seal the parts in place. Remember, these parts are designed for plastic tubs where they can be cemented in, we’re making them fit in a DIY way to a metal surface.
These are the jet bodies that you are going to need. You can see on the pictures below that the front screws off the body. This allows you to put a rubber gasket on each side of the Stock Tank, then you can screw the jet back together tightly to make the seal. This is an alternative option to glueing the body in place.


Once you have cut the holes for the lower drain, the actual drain that we use from Waterway does have a sealing ring and a losing nut to go on the back. You will be able to make a water tight seal just by tightening the nut. If it doesn’t, use some more of your epoxy resin to seal the join.
When you cut the hole for the skimmer, you need to measure the throat of the skimmer and not the face. The face needs to sit flush with the metal of the stock tank. The top of the skimmer should also sit flush with the top of the Horse Trough. This will ensure that you water level is around the middle of the skimmer.
Fitting the Plumbing
Hot Tub plumbing really falls into to parts, inlet out outlet. This is going to be the same for our Ultimate Stock Tank Hot Tub.
Inlet / Inward Plumbing
This part of the plumbing is where the water is sucked into the pump. The way in which the Hot Tub pumps work is that they draw water in from one side of the wet end and then push the water out of the other. On the inward draw side of things we have the Skimmer which is going to be connected directly to two “bottom drains” In our case, we are going to put these two drains onto the walls of the Stock Tank.
The reason that you have two drains is to make sure that the pump always has a flow of water even if one is blocked. This could damage the pump in the event this happened.
Then, we need to pass the water to the other side of the pump and the Outward Plumbing starts at the pump.
Outward Plumbing
The outward plumbing starts at the pump on the other side of the wet end. From here the water passes first through the filter, then through the spa pack where it is heated as it passes over the heating element. Then, it moves up through the jets into the tub. Therefore, your ultimate stock tank hot tub is going to be heated by the spa pack and the heater water is delivered to the tub via the jets. Simple enough to understand?
If you need the full plumbing diagrams for this build, they are available in our shop to purchase.
Making the Perfect Plumbing Joint
The first thing that you are going to do is make sure that your pipe is clean and free of any grease. The beauty of the hot tub pipe system is that if it is done correctly, it is just not going to leak. It is also not going to come loose in the future, it is there to last. Clean with some glass paper the ends of the pipe, remove any rough edges.
You then also need to clean the inside of the pipe fitting that you are going to connect. It should look all roughed up when you have cleaned it with the glass paper.
Next, you are going to need some pipe cement like this. It is not regular glue, it is special pipe cement.
Using the ball dabber that you find inside the tin, you then need to put a generous amount on the inside of the fitting that you have just cleaned. There is no need to put cement on both ends, just on the internal fitting. That will make for a clean and secure internal joint.
Push and hold the pipe and the fitting together for a few seconds. It will hold after about 5 or 6 seconds and be at full strength within 2-3 hours. This is fantastic stuff and makes for rock solid joints.
Top Tip – make all your joints at the perfect 90 degree angles – not like mine above. Joints made at the correct angle don’t leak. Forced joints do! (I am testament to this!)
Landscaping Options & Final Word
OK, so there are a few considerations here. You can of course leave your Ultimate Horse Trough with its “raw” and natural look. Or, you can make a deck to fit around it perhaps.
You could box in the plumbing and create a wood surround.
You could landscape with some large rocks to give the appearance of a rock pool. The list of options goes on and it really is down to you how you are going to finish the top.
If you would like some additional help with the parts, detailed diagrams and a shopping list. Perhaps you would like to have some or all of the parts supplied to you. We can help. Please get in touch and discuss your requirements. If you are looking for the diagrams, they are available in the shop here.
Thanks for reading
Happy “Horse Trough” Tubbin’
looking for hot tub & pool parts?
I have everything you need....
If you are looking for Hot Tub & Swimming Pool Parts, either for your DIY Hot Tub, plunge pool or swim spa build, or you are looking for parts to repair your pool or hot tub - then check out my USA & UK stores below.
I carry 30K+ product lines across the stores

Can I Help You?
If I can help you in any way I would love to hear from you. You can get in touch using the form below.
Thanks - Andi
 Hi, Andi here. I own Buildahottub.com and also write all of the articles and info pages on the site. Some years back now, I built my own hot tub but struggled to find the information I needed. So, once my tub was complete, I started this website to help others in their own pursuit of hot tub and plunge pools DIY building information.
Fast forward to 2025, I've helped over 1400+ DIY customers just like you all over the world build hot tubs and pools. Have a good look around the site, there are lots of resources here. Please do get in touch if I can help you. - Cheers, Andi

What I’d Change If I Built My DIY Hot Tub Again
Around eight years ago, I built my own DIY hot tub. You've probably seen it [...]
May
Out With the Cedar, In With an ICF Inground Hot Tub
Right, I've got a brand new project to introduce to the channel today – and [...]
Apr

Balboa Heat Modes Explained: Ready, Rest, Economy and Sleep — What They Actually Mean
If you've got a Balboa-controlled hot tub and you're not sure what all those heating [...]
Mar
How to Change an Air Button and Latching Relay on a Hot Tub, Pool or Spa Bath
If you've got an air button that's stopped working, or a latching relay that's given [...]
Mar
How to Choose the Right Air Source Heat Pump for Your Hot Tub or Pool
With so many air source heat pumps on the market right now, choosing the right [...]
Mar
Hot Tub vs Plunge Pool – Which Should You Build in 2026?
Right, this is one of those questions that lands in my inbox on an almost [...]
Mar
Patrick’s Wisconsin Basement Hot Tub & Cold Plunge – Waterproofing, Tiling & a Surprise Water Feature!
We're back with another update from Patrick in Wisconsin, and this one is a big [...]
Feb
Key Considerations for Building a DIY Hot Tub in 2026
So, you're thinking about building a DIY hot tub in 2026? Well, you've come to [...]
Feb