How to install a swim jet? With space being at a premium in most of our back yards, a counter current or a swim jet is a great addition to a DIY Hot Tub, Swim Spa, Plunge Pool or Cocktail Pool. Traditionally, not even traditionally, normally, these pieces of equipment run into the several thousand of dollars to install.
In this blog post, I will detail how to install a swim jet that I can supply you one for your own DIY build for under £1900/ $2000.
If you haven’t already, don’t forget to subscribe to my YouTube Channel and Follow me on Twitter
What is a Swim Jet or Counter Current?
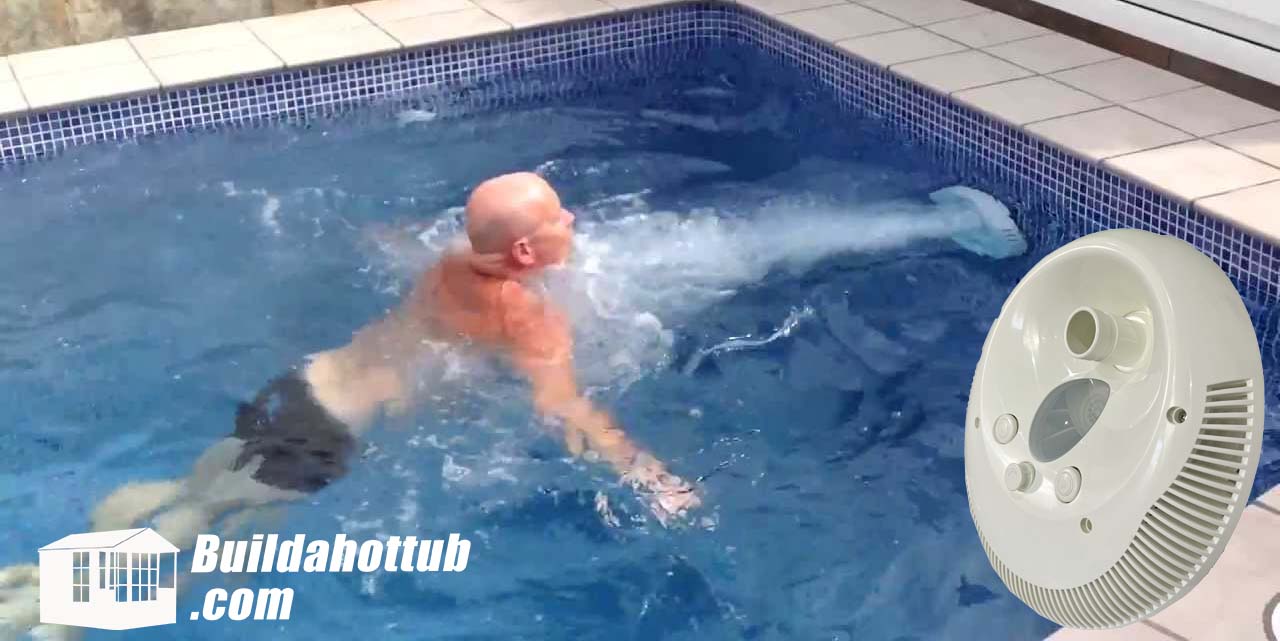
A Swim Jet or Counter Current is a machine that generates a flow of water against which you swim. When you swim at the same pace as the counter current, you are able to swim for as long as you like (or if you swim as well as I don’t lol, more “as long as your can!”)
The swim jet or counter current gives you a means of swimming naturally in a much smaller space than an Olympic sized swimming pool. This is ideal when space is of a premium in our back yards.

Who is this Swim Jet for?
Whilst there are models on the market that cost 4-6x the price of this particular unit, they are very much for the pro swimmer. This swim jet is not for the pro swimmer. This jet is good enough for a “fitness swimmer”, even a “good swimmer” but not a “professional swimmer” in training.
It is possible to adjust the flow and the angle of the jet, but if you are an athlete in training or a professional swimmer, you are going to want to invest in a hydraulic-based system. They can increase the flow of the current considerably more and are suited to the speed an athlete in training needs to swim. This is an electric or jet pump-based system which is ideal for you and I to improve our fitness in ones backyard.
If you are looking to have some really strong flow to swim against, this new model is able to be hooked up to two pumps to deliver even more power but still keeping down the cost.
How Does the Swim Jet Work?
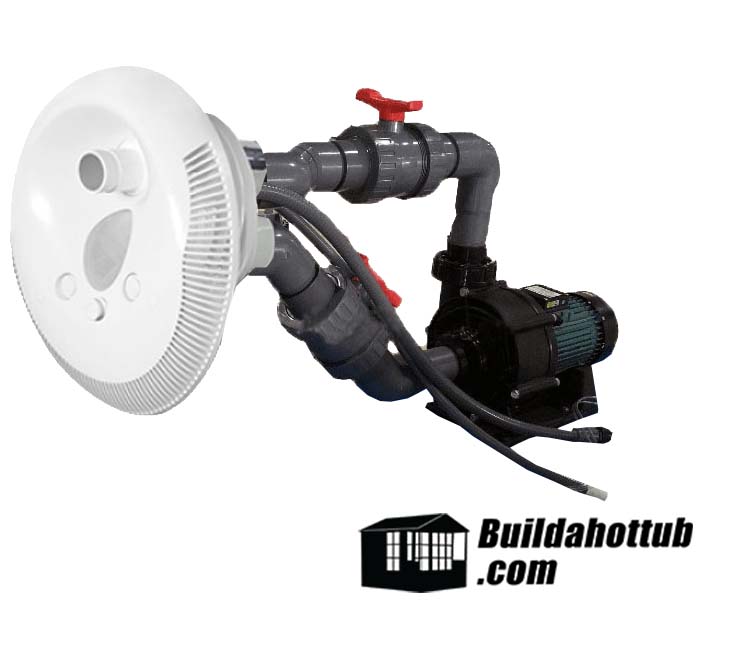
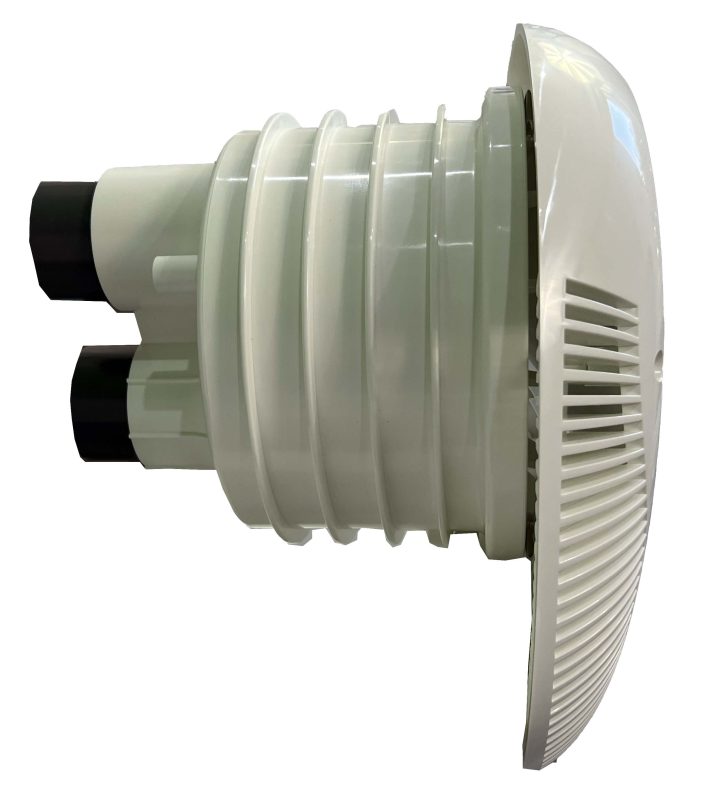
The counter current swim jet is a self-contained unit. The water is drawn in from the sides of the unit and then delivered back into the pool under pressure from the jet pump. There are clever designs inside the unit to minimise the amount of bubbles that are created.
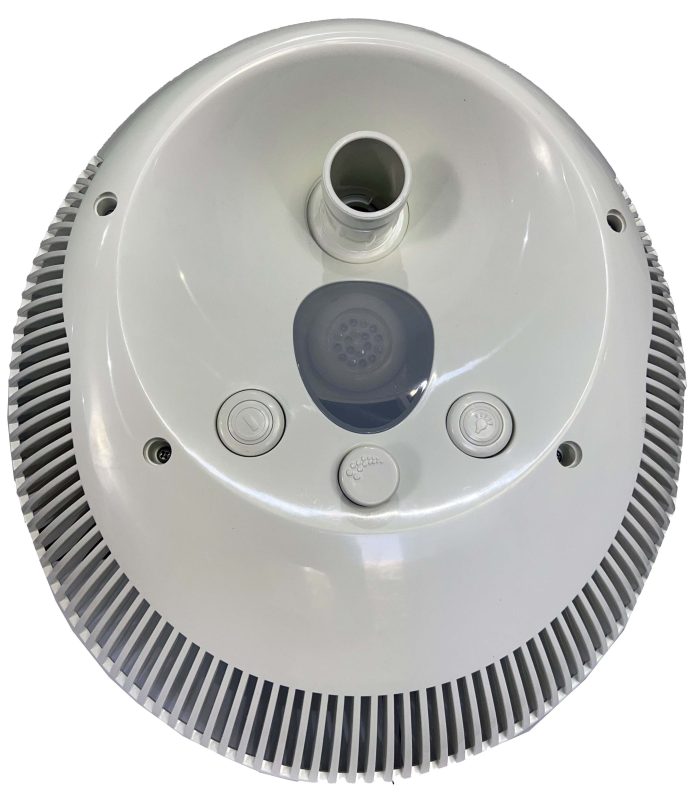
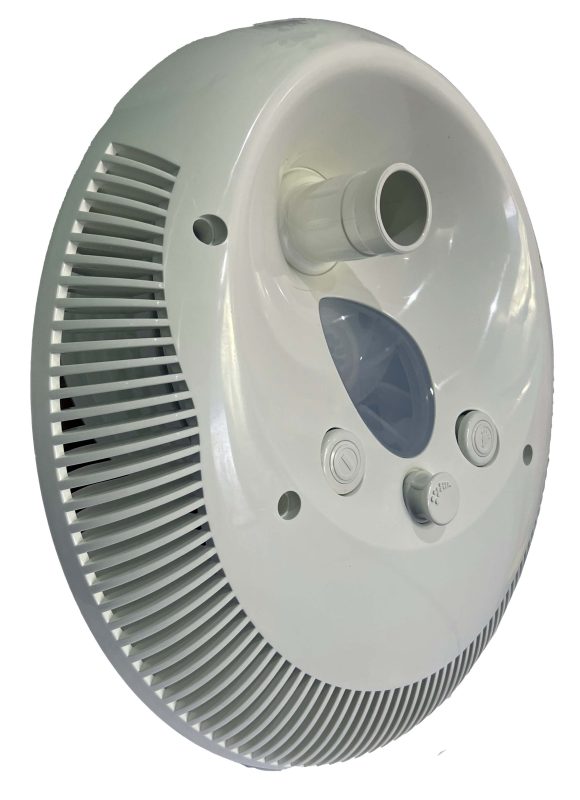
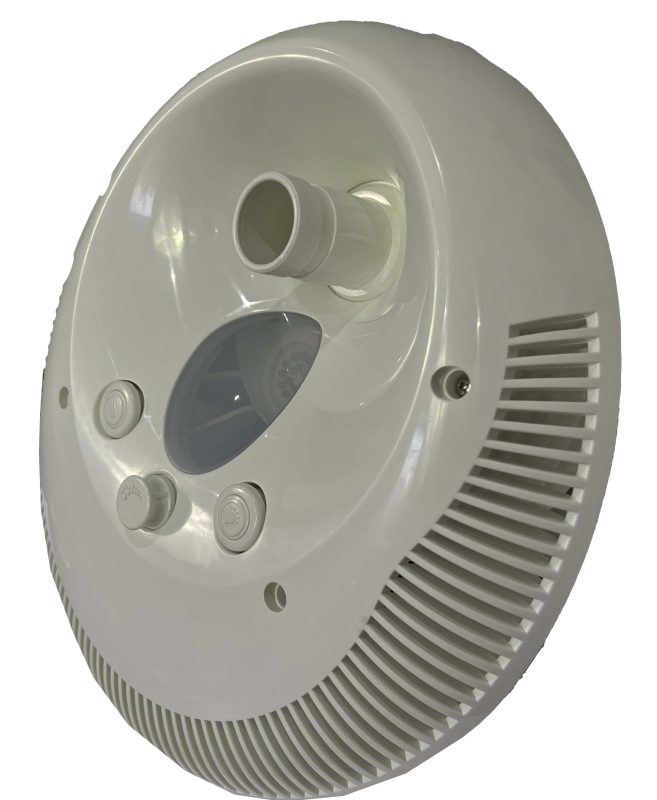
From the front of the unit, there is an air switch that allows you to turn the unit on an off.
The air switch itself (well, the actuator) is connected to the physical electrical switch via tubing that when pressed, the air turn on the switch which in turn, triggers the pump to run. Pretty cool. Now it’s time to install a swim jet.
What is the all new Swim Jet from Buildahottub.com?
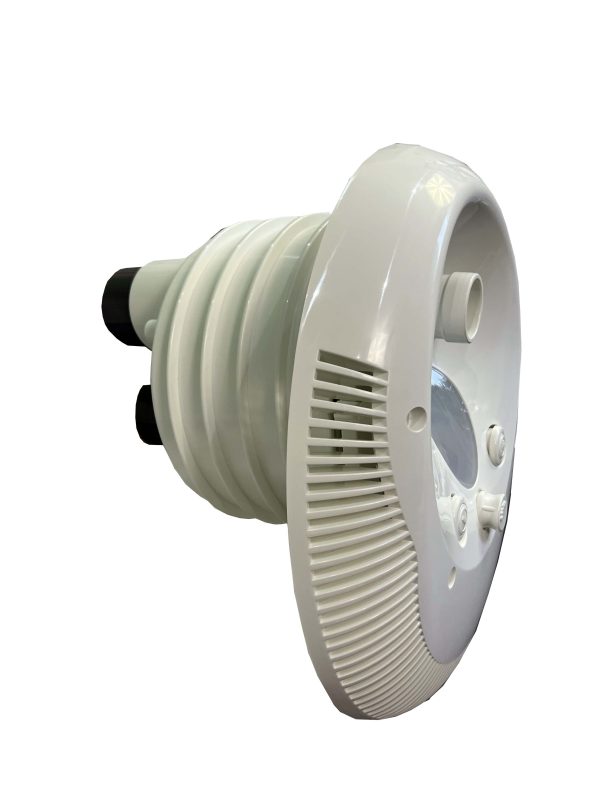
Available now (November 2023), the all-new swim jet from buildahottub.com builds on the success of the previous model but fills a gap in terms of installation and compatibility but also adds two new key features.
For the first time, the same swim jet is now compatible for Gunite/Shotcrete, Concrete, Block and **NEW** Liner Pools as well as fibreglass – all in the same unit.
What are the new features?
Firstly, there is the addition of an LED light. (please note you will need a 12V AC power supply for the LED light that is not included)
Secondly, there is the addition of an air control button so you can adjust the flow
There is also greater movement and direction on the swim jet nozzle.
What are the Different Options?
There are four different options for the new swim jet.
There was a lot of demand previously just for the jet on its own so that is now available. Likewise, some customers wanted a stronger jet so that is now available in dual pump mode.
- Swimjet Only
- Swimjet, Air Switches and Plumbing,
- Swimjet, Air Switches, Plumbing and 4HP Single Speed Pump
- Swimjet, Air Switches, Plumbing and DUAL 3HP Single Speed Pumps
What is in the Box?
What comes in the box really depends which model you have opted to go for. Please see the table below.
SWIMJET ONLY
| Swimjet (Body & Faceplate) |
| (Includes parts 1-19 on diagram) |
SWIMJET, AIR SWITCHES AND PLUMBING
| Swimjet (Body & Faceplate) |
| (Includes parts 1-19 on diagram) |
| 2 x Air Switches |
| 2 x 75mm Couplers |
| 2 x 75mm to 2″ Reducers |
| 2 x 2″ Ball Valves |
| 2 x 2″ 45 Degree Bends |
SWIMJET, AIR SWITCHES, PLUMBING & PUMP
| Swimjet (Body & Faceplate) |
| (Includes parts 1-19 on diagram) |
| 2 x Air Switches |
| 2 x 75mm Couplers |
| 2 x 75mm to 2″ Reducers |
| 2 x 2″ Ball Valves |
| 2 x 2″ 45 Degree Bends |
| 2 x 2″ Unions |
| 1 x 4HP Single Speed Pump (230V) |
SWIMJET, AIR SWITCHES, PLUMBING & DUAL PUMPS
| Swimjet (Body & Faceplate) |
| (Includes parts 1-19 on diagram) |
| 2 x Air Switches |
| 4 x 75mm Couplers |
| 4 x 75mm to 2″ Reducers |
| 4 x 2″ Ball Valves |
| 8 x 2″ 90 Degree Bends |
| 4 x 2″ Unions |
| 2 x 4HP Single Speed Pump (230V) 2 x 2″ Tee |
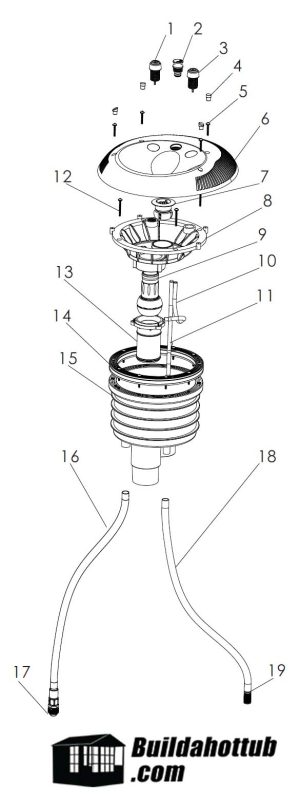
What is the parts breakdown of the Swim Jet?
1 Air button for water pump x1
2 Air Adjusting x1
3 Air Button for Water Light x1
4 Threaded Plug for Lid x1
5 M5*20mm Screws x4
6 Lid x1
7 LED spa light 1w, 12v
8 Support Frame x1
9 Water Jet x1
10 D12mm x 8mm x 40mm Air Adjusting Hose x2
11 D5mm x 3mm x 3M Transparent Hose x2
12 M6 x 20 Screw (AISI316) x4
13 Water Jet Fixed Pipe x1
14 Vinyl & Fiberglass Pool Fittings (2 x rubber gaskets and faceplate)
15 Swim Jet Body x1
16 Conduit for Light Cable and Air Hose x1
17 Cable Grand x1
18 Exhaust Hose x1
19 Venting Plug x1
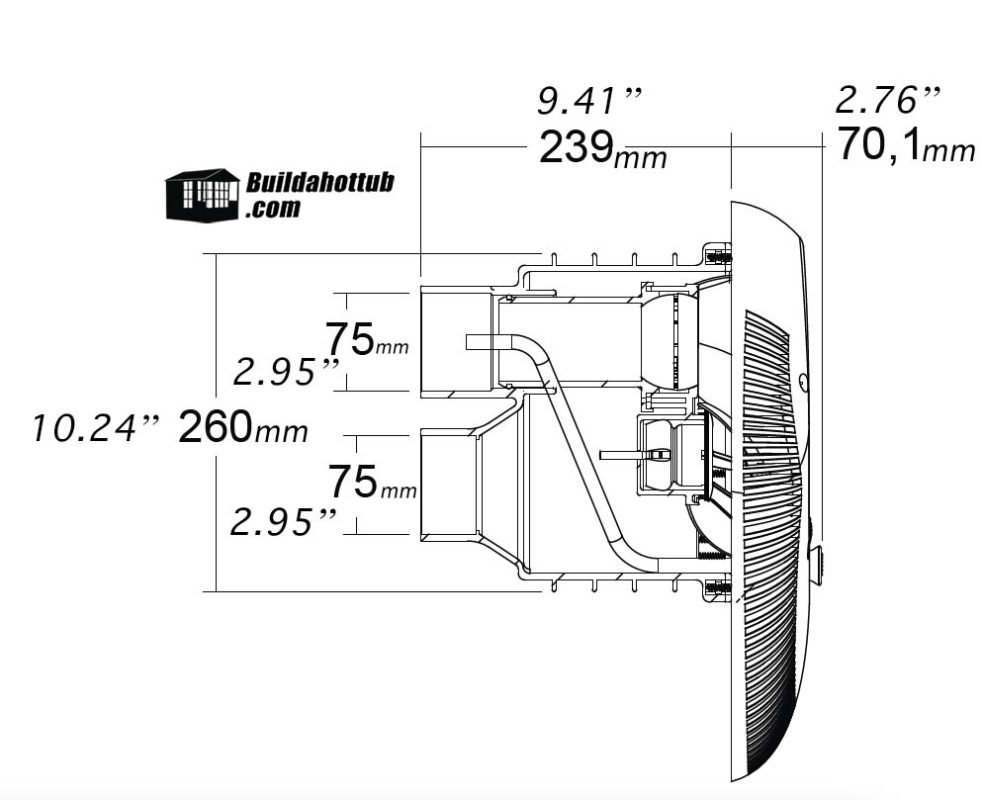
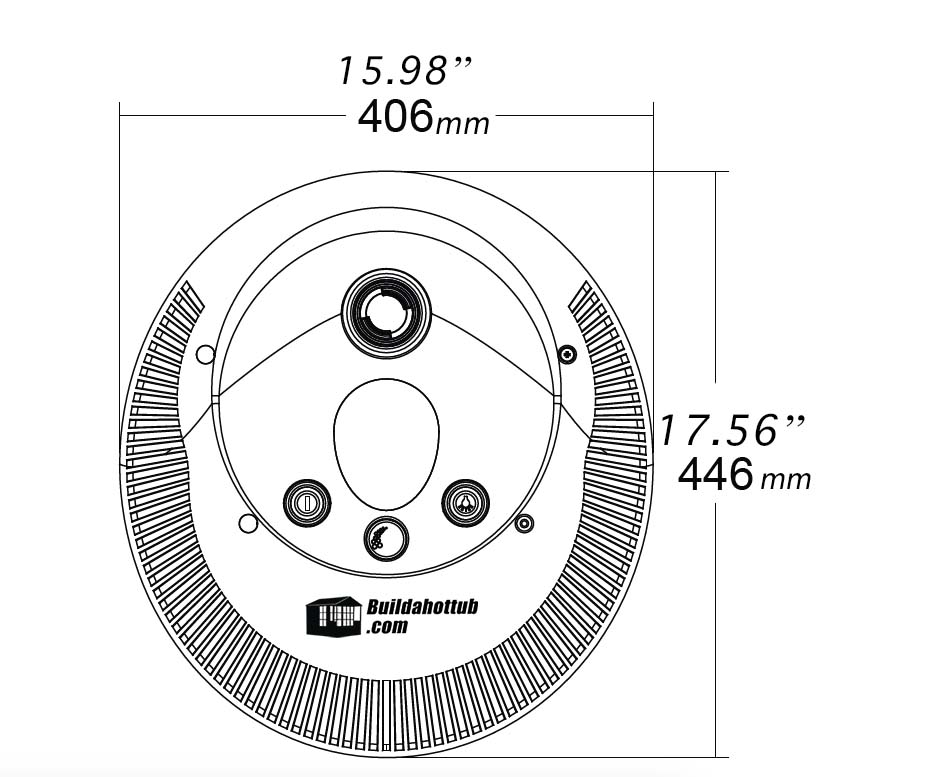
What are the Dimensions of the Swim jet?
Where do I position the Swim Jet in the Hot Tub or Pool.
Firstly, the pool or hot tub should be a minimum of 4m or 14′ in length. Otherwise, there can be a wave that comes off the back wall when you are swimming and can be off putting.
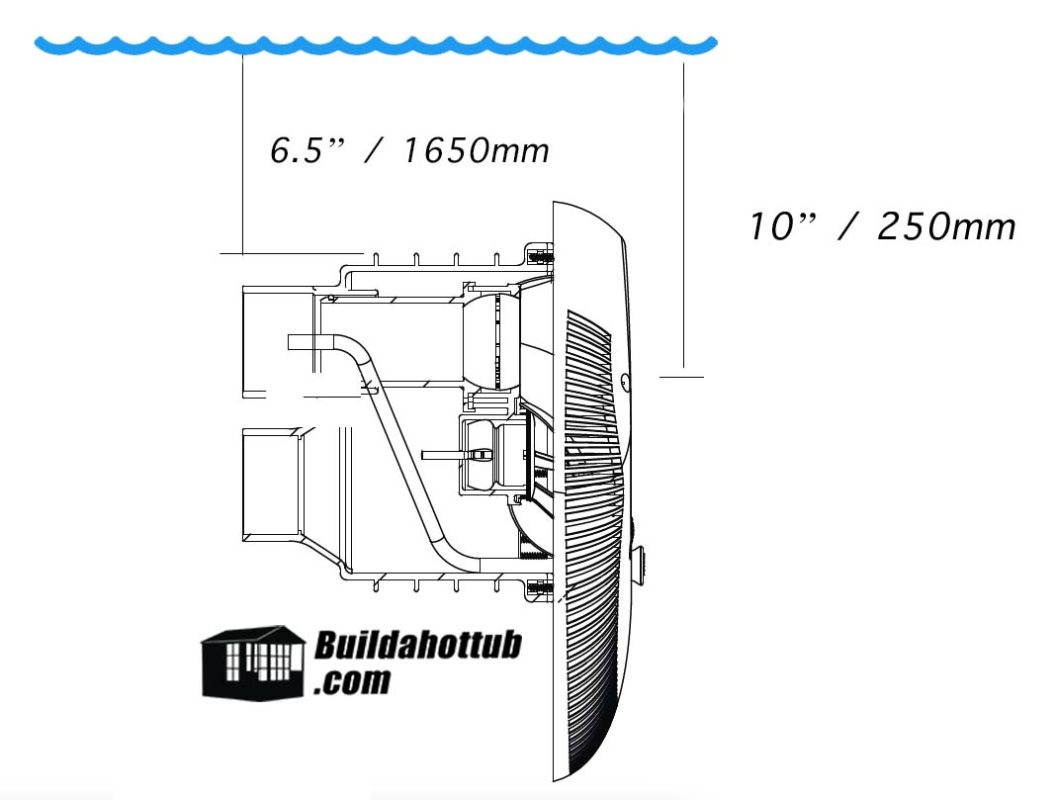
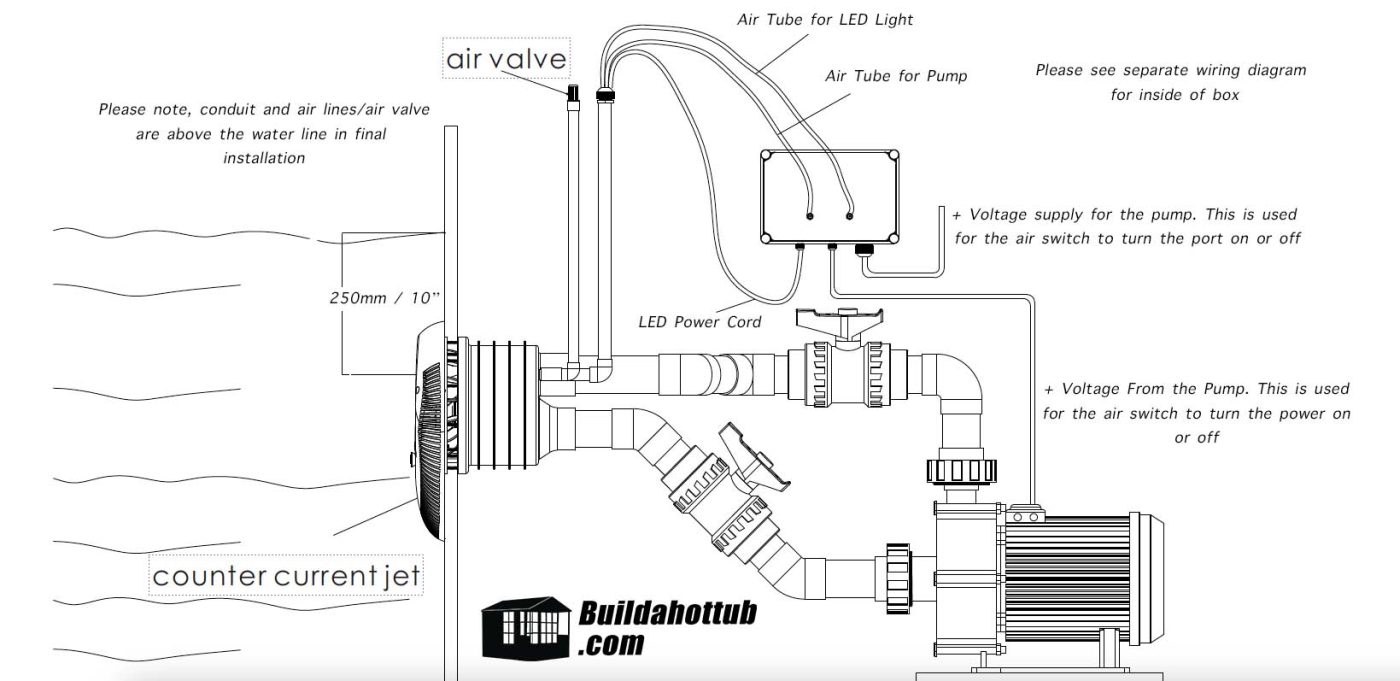
Secondly, the swim jet nozzle should be 250mm or 10″ below the surface. This is the same regardless of the type of construction method you are using on your pool or tub.
How do I install the Swim Jet in a Concrete / Block / Gunite / Shotcrete Pool or Tub?
Firstly, parts 14, the face place and the two rubber gaskets are not needed and can be discarded.
The Swimjet must be installed with the centre of the swimjet 250mm or 10” below the water line as the diagram above shows.
This means that the body of the swim jet should be 6.5” or 1650mm from the surface of the water as shown above.
The key with the installation on Concrete, Block, Gunite or Shotcrete is that the base of the swim jet (Part #15) is installed so that it is flush against what will be the finished surface of the Hot Tub, Swim Spa or Pool.
Please refer to the Diagram Below.
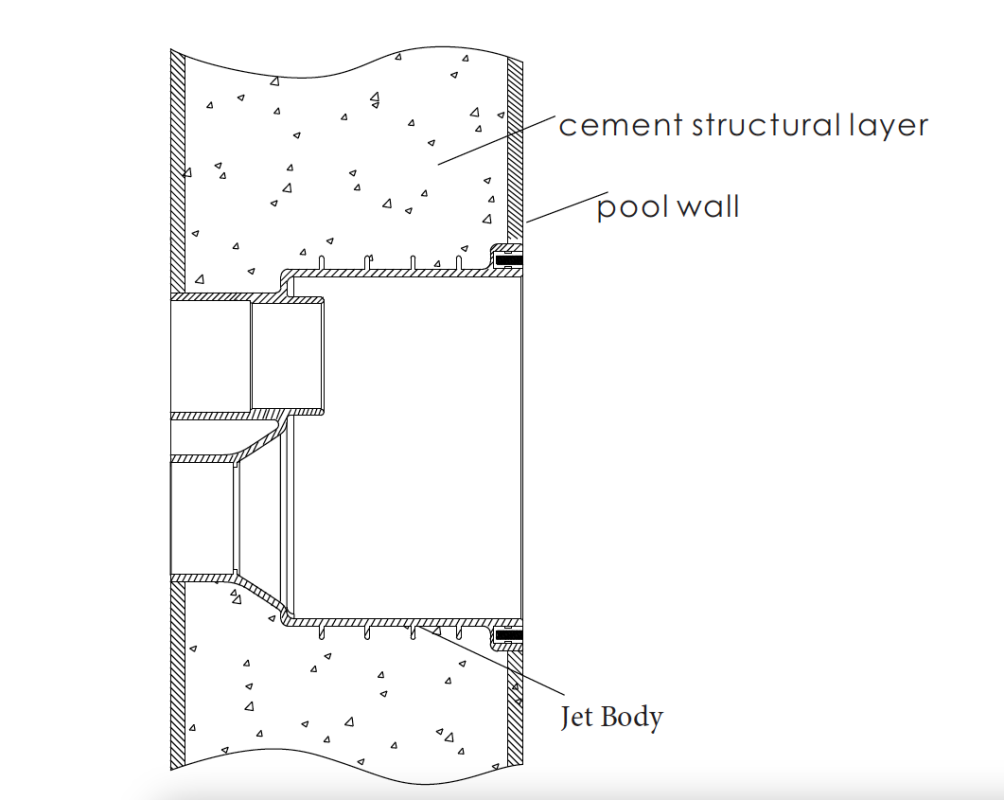
In the case of a block build, you will need to leave an appropriate hole, fit the jet body (Part #15) and then cement around the jet body to secure it firmly in place. Make sure that the jet is sealed in and watertight so there no leaks.
The physical body of the jet is 260mm in diameter or 10.24”, if you are looking to leave a hole you should leave 11” diameter so there is adequate space for a concrete fill and seal around the jet body.
Once the pool or tub surface has been finished with tiles, pool paint or the like, the next step is to assemble the faceplate.
Firstly, the Air Tubes (for the press buttons part #10) should be attached to the button for the light (part #3)as well as the button for the pump (part #1). Please note, you will need to remove the screw nut on the top of them in order to attach the tub. Before you attach the tub, place the screw nut onto the air tube so it can be tightened in place afterwards.
With the air tube secured on each of the buttons, slide the protective pipe covers (part #11) down the air tube to the of the tube where it meets the button. This pipe cover protects the air lines.
Next, thread the power cord for the LED Light, as well as the two air button tubes out the back of the base of the swim jet and into the conduit (part #16). You can then attach part #16 onto the base (part#15) and tighten part #17 the cable gland.
Please note, the final position for parts #16 and #18, should be above the water line as shown in the final installation diagram below.
Next, part #8, the support frame should be slid into place firmly in the base (part #15) and then screwed into place using the M6 screws (part #12)
Finally, the face place (part #6) should be placed over the supporting frame (part#8) and screwed into place using the M5 screws x 4 (part#5)
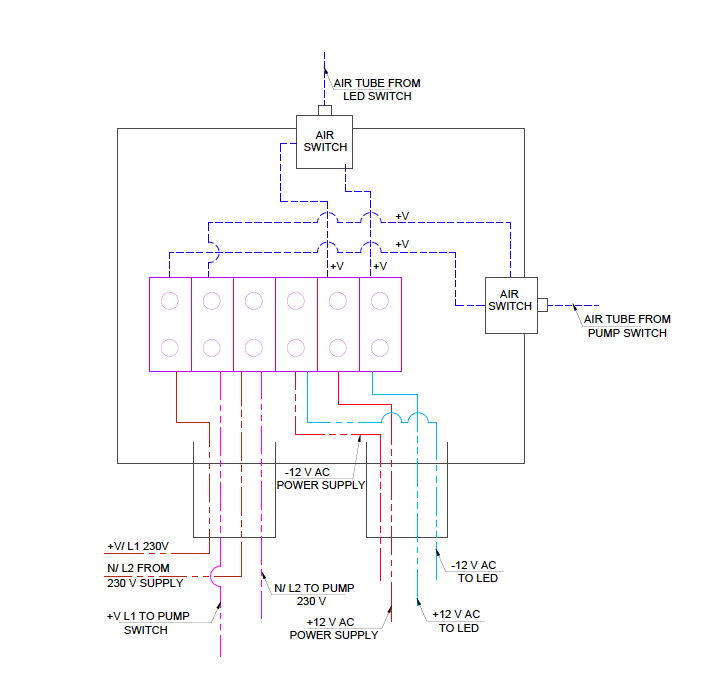
Please see the separate section on how to wire the Swim jet.
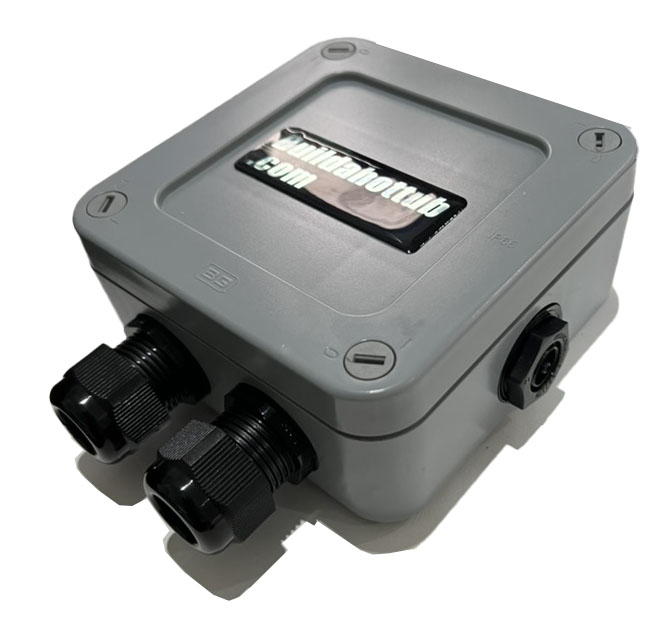
The Air Switch Control Box
How to install the Swim Jet on a Liner Pool.
The Swimjet must be installed with the centre of the swimjet 250mm or 10” below the water line as the diagram above shows.
This means that the body of the swim jet should be 6.5” or 1650mm from the surface of the water as shown above.
The key with the installation is that the base of the swim jet (Part #15) is installed so that it is flush against what will be the finished surface of the Hot Tub, Swim Spa or Pool, right up to the liner.
Please refer to the Diagram Below.
Next, the 16 holes need to be cut/spiked through the liner so that the rubber gasket (O ring) (Part #14) can be placed either side of the liner as shown below.
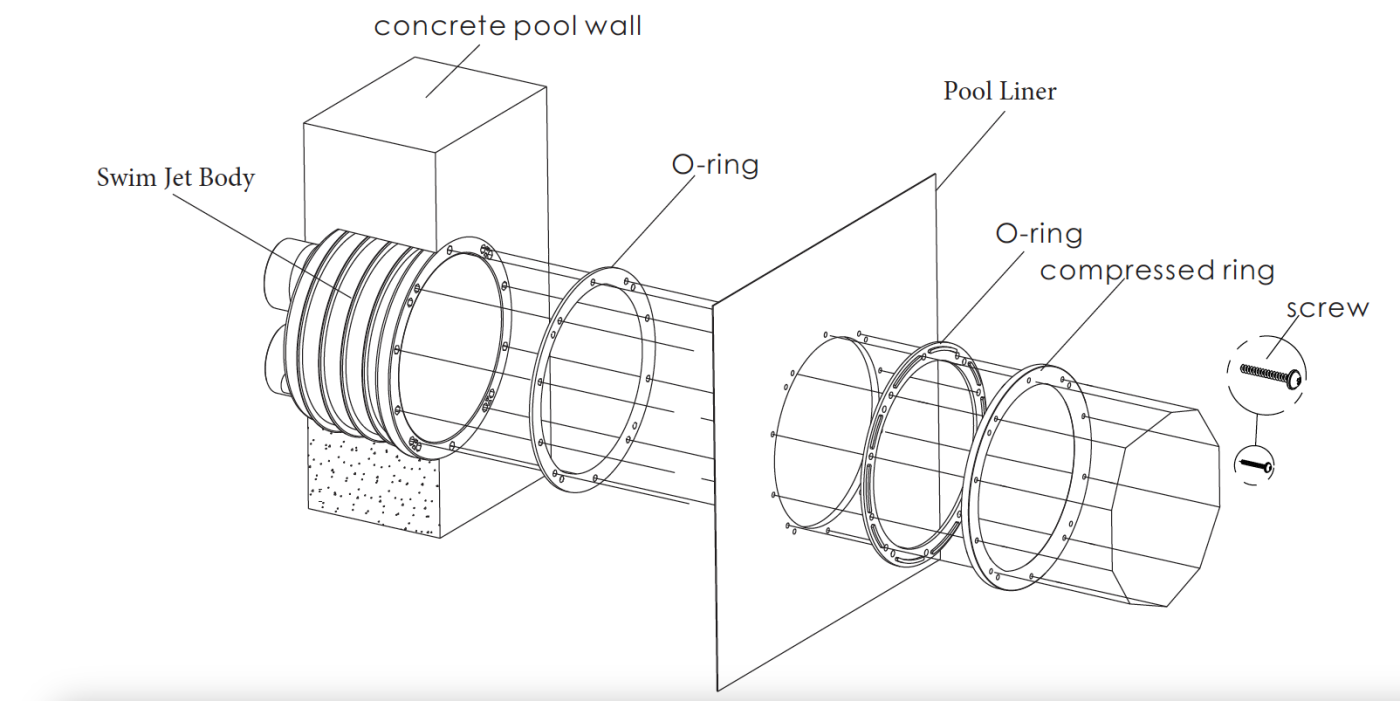
The plastic holding ring, or compressed ring can then be screwed into place with the 16 screws. This will make a tight seal onto the liner.
Once the liner holder is in place, the next step is to assemble the faceplate.
Firstly, the Air Tubes (for the press buttons part #10) should be attached to the button for the light (part #3)as well as the button for the pump (part #1). Please note, you will need to remove the screw nut on the top of them in order to attach the tub. Before you attach the tub, place the screw nut onto the air tube so it can be tightened in place afterwards.
With the air tube secured on each of the buttons, slide the protective pipe covers (part #11) down the air tube to the of the tube where it meets the button. This pipe cover protects the air lines.
Next, thread the power cord for the LED Light, as well as the two air button tubes out the back of the base of the swim jet and into the conduit (part #16). You can then attach part #16 onto the base (part#15) and tighten part #17 the cable gland.
Please note, the final position for parts #16 and #18, should be above the water line as shown in the final installation diagram below.
Next, part #8, the support frame should be slid into place firmly in the base (part #15) and then screwed into place using the M6 screws (part #12)
Finally, the face place (part #6) should be placed over the supporting frame (part#8) and screwed into place using the M5 screws x 4 (part#5)
Please see the separate section on how to wire the Swim jet.
Latching switches
Latching switches are switched on by the user and then remain on until switched off again. They do not require continuous compression from the user.
Latching switches can be found in the home and are used for things like light switches, central heating switches or on stereos.
Momentary switches
Momentary switches require continuous compression. They will switch on when the user compresses the switch and will remain on only for as long as there is pressure on the switch. Once the pressure is removed they will switch off. For example; a door buzzer or an electric drill.
The pump’s live (hot) cable will then be split and connected to either side of the air switch. When the actuator (button) is pressed, the circuit is made and the jet will turn on. When it is pressed again, it will disconnect the circuit and stop the pump.
Pretty straight forward but very effective and keeps electrical connections away from the pool or spa which is much safer.
Time for Testing
Next, time to fill up the tub and run the jet. Don’t test for more than a second or so if you are just testing the electrical connections as the pumps are not designed to be run try without water flowing through them.
Do you need a Swim Jet for your own DIY Hot Tub or Plunge Pool Build?
If you do, please do get in touch with the form below. Always happy to help and give you a quotation on the parts you need.
Happy Hot Tubbin’