
Last updated: September 2026
If you read this blog or watch my YouTube channel, you’ll know I talk an awful lot about the control room. It’s the hub of your hot tub. Get it wrong and you’re in trouble. Worst case, the tub just won’t work.
As I’ve said a thousand times, I really wasn’t sure what I was doing when I built my hot tub. Since then I’ve helped more than 1,500 people with their own projects. But there was always something niggling away in the back of my mind: the part of my own tub I was least proud of. The control room.
The short version
- Why I rebuilt it: a leak, badly made joints held together with epoxy putty, a filter lying on its side, a blower shoved behind the skimmer, and messy wiring.
- What I changed: rigid pipe with properly made joints, a wider control room, the blower on a shelf with its air lines above the water line, supported pipework, and tidy electrics in a weatherproof box.
- The big upgrade: an air source heat pump, with the filter moved onto the heating circuit. Heating went from about 0.5°C an hour to around 6°C in 80 minutes, and my weekly cost dropped by about two thirds.
- The lesson: make the control room bigger than you think, plan every joint, and leave room to change a filter without taking the plumbing apart.
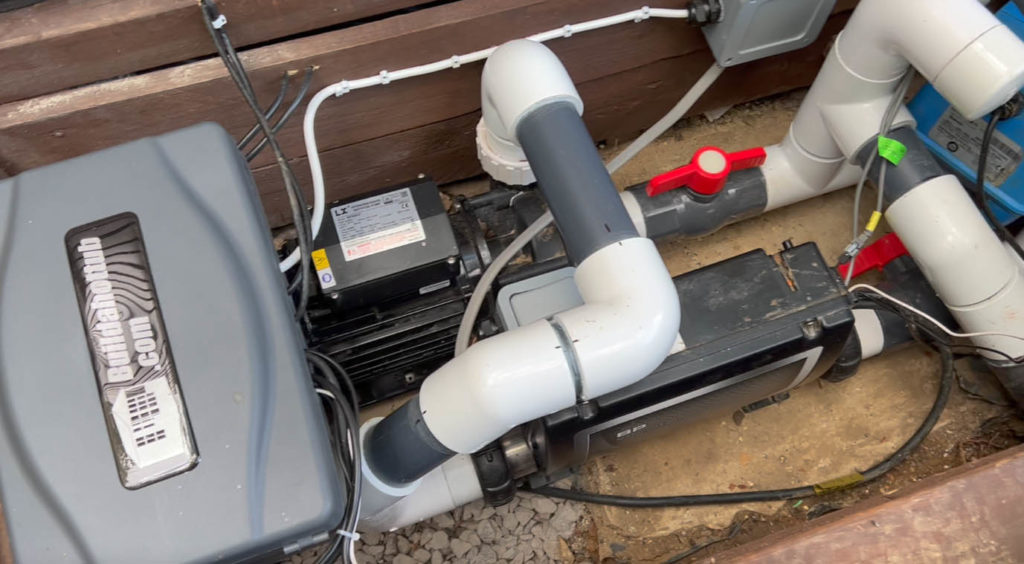
Time for a renovation
I made lots of mistakes when I built my own hot tub, and most of them are documented here on the blog and on YouTube. Making them, and learning how to avoid and fix them, is what qualifies me to help other people with their builds. Making mistakes is natural. On this site, I help you avoid mine.
Over time I’d been swapping out parts and renovating bits of the plumbing, putting right the original mistakes. Then I sprang a leak in the control room, and that was the push I needed for a full “control room renovation”. I knew it would be a few weeks’ work.
What was wrong with the old one?
- The pipework was done badly. The joints were just “made to fit” rather than planned in a logical way. They’d been forced into position. Not how it should be done.
- The filter was on its side. A bad calculation meant it was too tall to fit upright. Changing the cartridge meant taking the whole filter housing out of the plumbing every time. It was a job I absolutely hated.
- The blower was shoved in behind the skimmer, with the air pipe wrapped round it at a funny angle.
- The control room was too small. There was no room to work.
- The wiring was all over the place. I must have been in a rush to finish it originally (well, I know I was).
Yes, it had worked for all those years, but it was far from perfect. There was plenty to do.
The plan
I couldn’t redo everything. Much of the pipework is set in concrete in the tub, and I wasn’t about to pull that apart when it works well. So the plan was:
- Cut the pipework back so there was just a connection to the inward plumbing from the skimmer and the bottom drains.
- Remodel the air pipework from the blower and the outward pipework from the pump.
- Add an extra 6in (150mm) to the width of the control room.
- Swap the filter for a top-loading one, so changing the cartridge wasn’t a “project” every month.
- Most of all, do it in a way I’d actually be proud of: joints made properly, pipes at the correct angles, and the darn filter standing vertically.
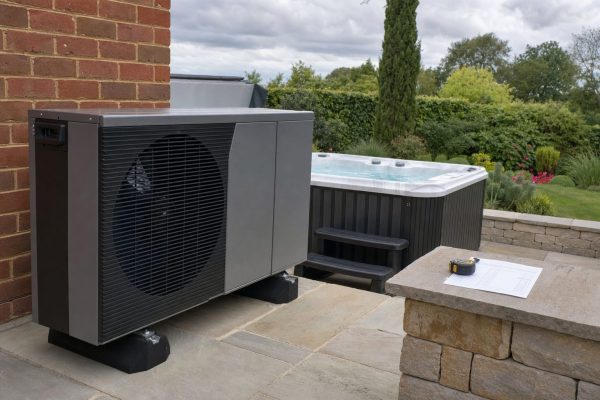
A crazy idea: let’s add an air source heat pump!
Some of you will have read how I fitted an air source heat pump to my friend Paul’s hot tub. That got me thinking. The numbers he sent me on the first evening, heat-up speed against current draw, were pretty compelling, especially the screen grabs from his smart meter.
My tub was heating at about 0.5°C an hour. It was really slow, and before the energy price rises it was costing me around £50 ($63) a week to heat. Pretty expensive, I know. I was sure a heat pump would heat it much faster and cut the running cost dramatically. So, mid-remodel, I changed the plan to include one. (Yes, I ended up remodelling the remodel.)
How it turned out: my old 3kW heater took about 12 hours to heat the tub from 33°C to 39°C. With the heat pump, it takes about 1 hour 20 minutes at an outdoor temperature of 15°C. By the time I measured properly, the energy price rises had pushed my weekly cost with the old heater to about £100. With the heat pump, it was about £34, a saving of 66%. The full numbers are in How I saved 66% on my hot tub electricity cost. The reasons I chose one are in Why I fitted an air source heat pump to my hot tub.
Let’s get started
First I drained the tub. I was going to be cutting into the plumbing, so the water had to be well below the control room level or it would flood. While the submersible pump was running, I slowly and carefully removed the blower, pump, spa pack and filter from the control room. Most of the original parts would be going back in.
With the water out, it was time to chop out some plumbing. It wasn’t until I removed some of the “interesting” joints I’d made that I could see just how bad a job I’d done. The amount of epoxy putty on the misshapen joints said it all. What I can say with confidence is that my plumbing has come on hugely since, thanks to all the work I’ve done helping others.
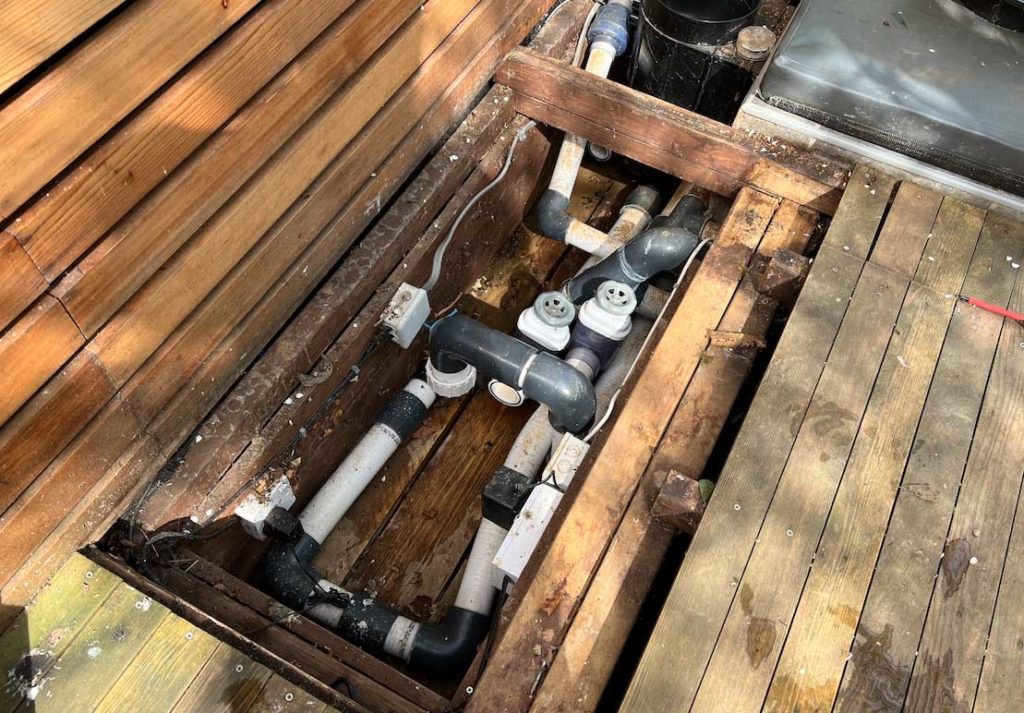
This is the old control room with the pump and spa pack removed, so you can clearly see the state of the plumbing.
How a joint should not look
I don’t mind sharing how bad things were. This is the section of the inward plumbing where the two lower drains connect to the skimmer and then the pump’s suction.
Look at the joint below and how it was put together, and the amount of epoxy putty holding it. Yuk! Why was there putty there in the first place? Easy. The joint wasn’t made properly, so it leaked. I couldn’t pull it apart with a tub full of water, so I patched it up.
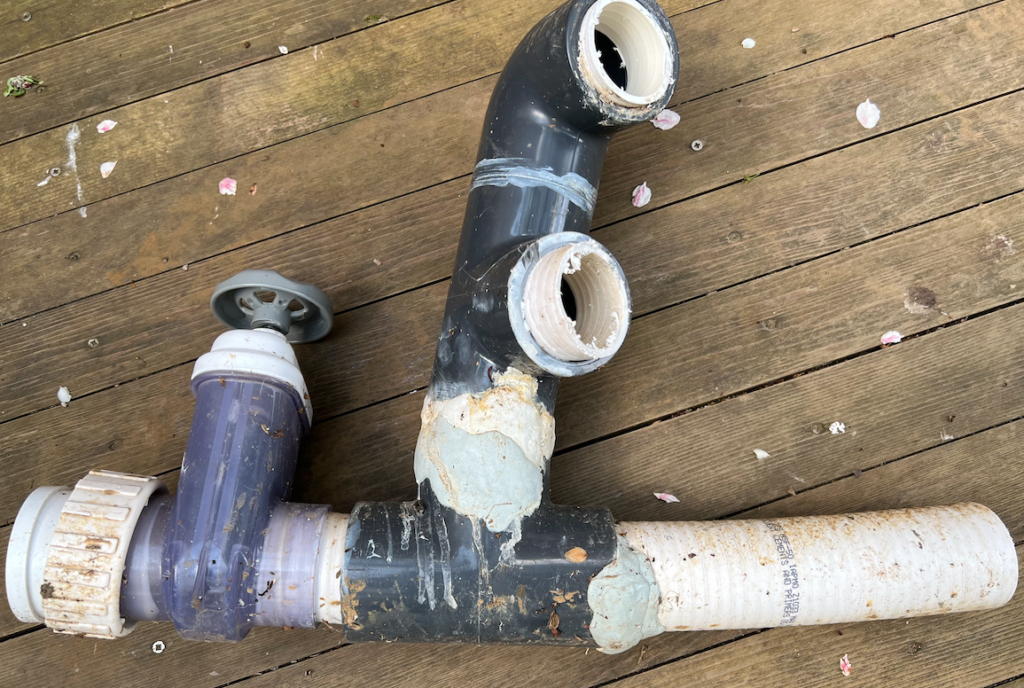
Top tip: make your joints properly. Take your time and they won’t leak. Clean, prime and solvent weld every joint, and push it fully home. My guide to the perfect PVC solvent weld joint shows you how.
Rigid pipe, no forcing
This time I made sure I used rigid pipe. Rigid pipe isn’t forgiving at all. It won’t let you move a few inches if you haven’t lined up the joints, and you can’t squeeze it into place. That’s exactly why I wanted it. The result is exact joints that are perfectly aligned. If they weren’t, they’d have to be cut out and redone. There was no way I was going to botch any of the joints in the new control room. There’s more on pipe choices in Hot tub pipe: the ultimate guide.
Digging a bit deeper
With most of the old pipes out of the way, I moved the heater to the other side and shifted the pump over a little to make more space. At the back of the control room I dug down another 6–8in (150–200mm) so there’d be room to fit the filter vertically this time.
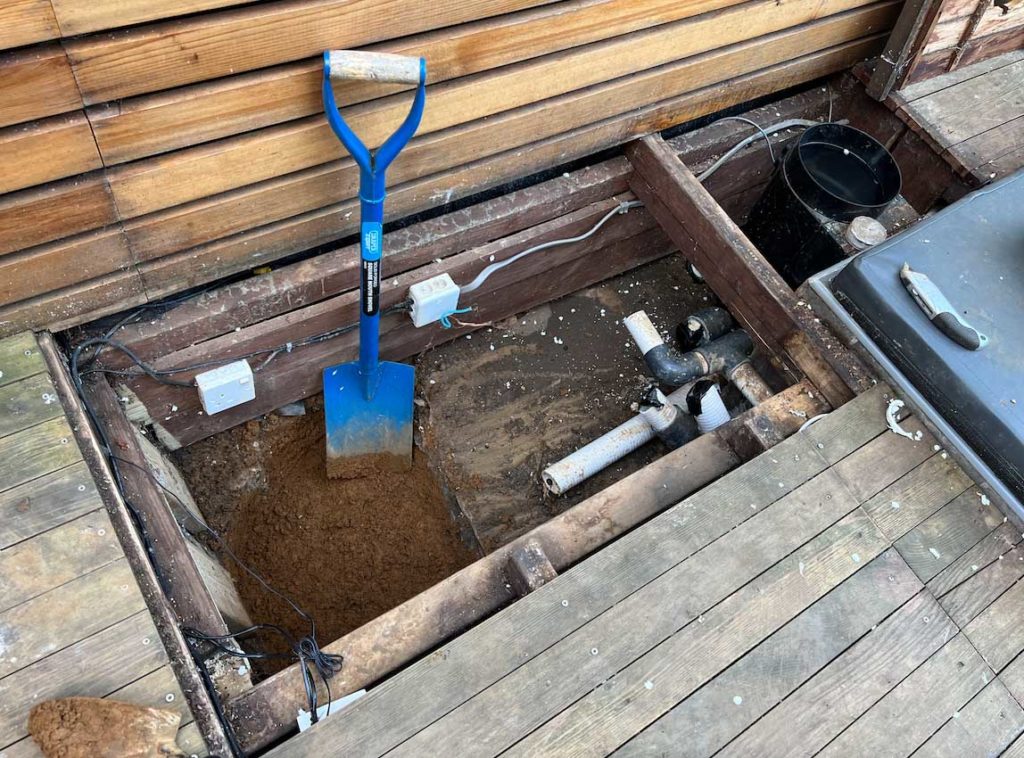
As it turned out, that bit was somewhat in vain. When I decided to add the heat pump mid-remodel, the plumbing layout changed and the filter moved elsewhere (more on that below).
The new plumbing takes shape
What a difference! The joints are properly made, and the angles are right. Nothing’s been forced to fit. It just fits.
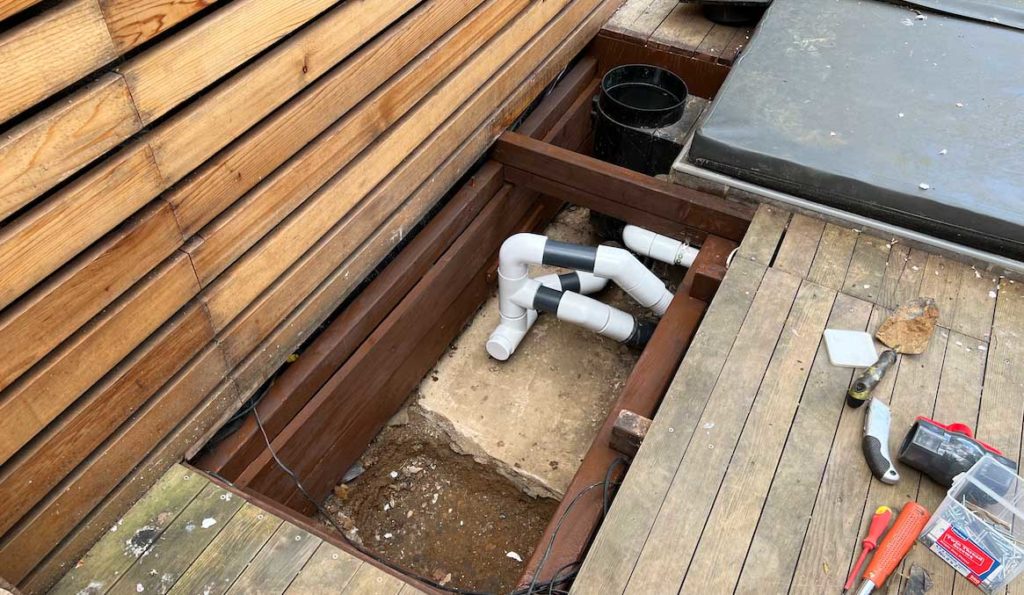
Compare that with the epoxy photo above. Ouch! Yes, it took some planning and careful measuring, but that’s what you should be doing, not ordering tubes and tubes of epoxy off Amazon to fix your leaks. (Yes, I’m guilty here.)
In the picture, the skimmer is connected to the two lower drains, which tee into the suction side of the pump. There’s a temporary stopper in the end to keep unwanted “guests” out of my plumbing. That end gets a ball valve and then a pump union. Valves on both sides of the pump mean you can take it out without draining the tub. If you’re not sure what goes where, How does hot tub plumbing work? explains the whole circuit.
The blower: on a shelf and above the water line
Previously the blower was just “shoved” in behind the skimmer. Yes, literally shoved in. This time I built a small shelf over the inward plumbing to house it. That meant I could take the air pipework up vertically and above the water line.
That’s good practice. Don’t rely on the check valve alone to keep water out of your blower. Take the blower lines up and over the water line, and gravity won’t let water run back into the blower. It also decluttered things dramatically. There’s more in Top tip for installing an air blower and, if it’s already happened to you, Water in a hot tub air blower: help!
Support your pipework
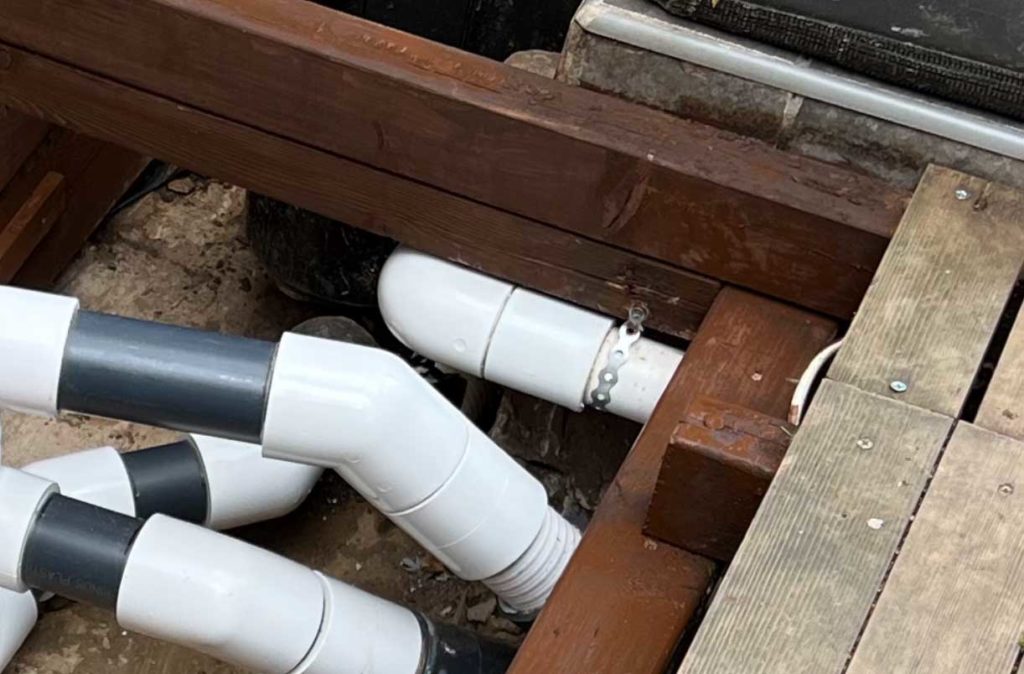
One thing I didn’t do the first time was support my pipework. Pipes full of water weigh a huge amount, and that weight pulls on the joints. So this time everything is supported. The 1.5in air lines have a metal clip holding them firmly in place, and I’ve hung one run from a supporting chain. Pipes shouldn’t just hang. Clip and support them wherever you can, so they don’t wiggle loose over time.
New retaining walls, and letting it drain
Next came new retaining walls. They’re simple wood panels, there more to keep the earth back than anything else, with a fresh coat of stain. I don’t intend to make the control room watertight, because in a leak the water would have nowhere to go. With the base left open, water can drain into the ground. My original worry was water coming up from the ground, but years in, that’s never happened. So this time I’ve put stones on the base instead of a timber floor.
That works on my ground. If you’re on heavy clay or have a high water table, plan a sump with a small submersible pump from day one. Hot tub control room position covers drainage in more detail.
Tidy cables and a weatherproof electrical box
I really wanted to do things properly this time, so I tidied up all the cabling and put the electrical connections in an IP55 weatherproof box. Before, there was a regular indoor socket bolted to the side of the control room. It was pretty well sheltered from the elements, but I was taking a chance with a regular socket, not even an outdoor-rated one.
What I’d tell you today: the IP55 box was a big improvement, but there’s more to it than the box. The IET’s guidance on hot tub installations recommends applying the swimming pool section of the wiring regulations (BS 7671 Section 702) to outdoor hot tubs. It says best practice is fixed wiring rather than socket-outlets, that equipment outdoors near the tub needs at least IPX4 (IPX5 where it could be hit by water jets), and that everything needs 30mA RCD protection. In the USA, NEC Article 680 covers the same ground. So plan the control room electrics with your electrician rather than adding sockets as you go. Hot tub wiring explained covers the UK and US rules.
Remodel complete!
And there it is: a fully functional, rebuilt control room, and finally one I’m proud of. You’ll notice there’s no filter in the photo at the top of this post. That’s because I moved the filter onto the heating circuit for the air source heat pump. I’ve covered that setup in How to add an air source heat pump to your hot tub: step by step.
If I were building a control room today
Here’s the checklist I’d work through now, based on my own remodel and what I’ve seen on customer builds:
| Do this | Why |
|---|---|
| Make it bigger than you think | You need room to get your hands in, swap a pump and lift a filter out. I had to widen mine. |
| Keep the pumps below the water line | Standard hot tub pumps won’t prime above it. |
| Check the filter’s height, including cartridge removal | A tall filter on its side (my mistake) turns a 5-minute job into a project. |
| Valves either side of the pump and heater | So you can service them without draining the tub. |
| Blower on a shelf, air lines looped above the water line | Stops water getting back into the blower. |
| Rigid pipe, planned joints, everything supported | No forced joints, no weight hanging on fittings, no leaks. |
| Drainage: gravel base, soakaway or sump | A below-ground control room will get wet one day. |
| Electrics designed by an electrician, off the floor | Fixed wiring, RCD/GFCI protection, the right IP ratings and a proper isolator. |
| Plan for a heat pump and a second pump | Even if you add them later, leave the space and the pipe connections. |
For layout and sizing, read Hot tub control room design considerations. For more of the things I’d change, see What I’d change if I built my DIY hot tub again.
Want your control room done right first time?
I’ve put everything I learned from this remodel, and from helping so many others, into The Ultimate Hot Tub Control Room Guide. If you’re starting from scratch, my DIY hot tub plans include the full plumbing layout and parts list, so your control room is planned before the first pipe is cut.

FAQs
How big should a hot tub control room be?
Bigger than the equipment. Measure the kit, then add room to reach every union and valve, lift the filter cartridge straight out, and get a pump out without cutting pipe. Mine was too small and I had to widen it.
Should the hot tub control room be waterproof?
Keep rain off the equipment, but give the floor somewhere to drain. A sealed pit just fills up when a union weeps. I use a stone base that drains into the ground. On clay or a high water table, fit a sump.
Why is my hot tub filter so hard to change?
Usually because the filter was squeezed in without headroom, or on its side. A top-loading filter with clearance above it, and valves either side, makes it a quick job.
Can I put sockets in my hot tub control room?
The IET’s best-practice guidance is fixed wiring rather than socket-outlets near hot tubs, with 30mA RCD protection and suitably IP-rated equipment. Talk to your electrician before adding any.
Got a question about your own control room? Drop it in the comments below. I read them all.
Cheers,
Andi
You can also find me on my socials;






looking for hot tub & pool parts?
I have everything you need....
If you are looking for Hot Tub & Swimming Pool Parts, either for your DIY Hot Tub, plunge pool or swim spa build, or you are looking for parts to repair your pool or hot tub - then check out my USA & UK stores below.
I carry 30K+ product lines across the stores

Can I Help You?
If I can help you in any way I would love to hear from you. You can get in touch using the form below.
Thanks - Andi
 Hi, Andi here. I own Buildahottub.com and also write all of the articles and info pages on the site. Some years back now, I built my own hot tub but struggled to find the information I needed. So, once my tub was complete, I started this website to help others in their own pursuit of hot tub and plunge pools DIY building information.
Fast forward to 2025, I've helped over 1400+ DIY customers just like you all over the world build hot tubs and pools. Have a good look around the site, there are lots of resources here. Please do get in touch if I can help you. - Cheers, Andi
Plunge Pool and Hot Tub Combo: How to Design One Project That Does Both
Can you have a hot tub and a plunge pool in one project? Yes. Here [...]
Sep
DIY Hot Tub Cost Breakdown for 2026: Where the Money Actually Goes
What does a DIY hot tub cost in 2026? A line-by-line breakdown of an 8ft [...]
Sep

Can a Self-Confessed Rubbish DIYer Build a Hot Tub? Meet Matt
his might just be the biggest challenge my DIY hot tub plans have ever faced. [...]
Jun
What I’d Change If I Built My DIY Hot Tub Again
Four things I'd do differently if I built my DIY hot tub again: ICF, a [...]
May
Out With the Cedar, In With an ICF Inground Hot Tub
Right, I've got a brand new project to introduce to the channel today – and [...]
Apr
Balboa Heat Modes Explained: Ready, Rest, Economy and Sleep
Ready, Rest, Economy, Sleep: what each Balboa heat mode does, how to switch between them [...]
Mar
How to Change an Air Button and Latching Relay on a Hot Tub or Pool
Air buttons and latching relays are cheap and easy to replace. Here is how they [...]
Mar
How to Choose the Right Air Source Heat Pump for Your Hot Tub or Pool
Five things to check before buying an air source heat pump for your hot tub [...]
Mar